Vendor-Provided Trainings
- Meeting/Webinar Best Practices & Resources
- Recorded Training Sessions
- Video Tutorials
- Live Training Webinars
Support Guides
Meetings
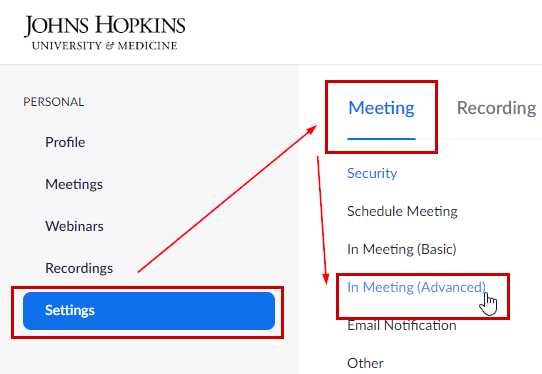
Meeting Settings & Controls
Scheduling
Desktop
Mobile
H.323/SIP/Room Connectors
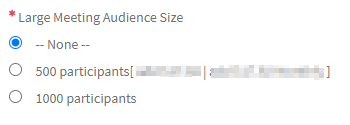
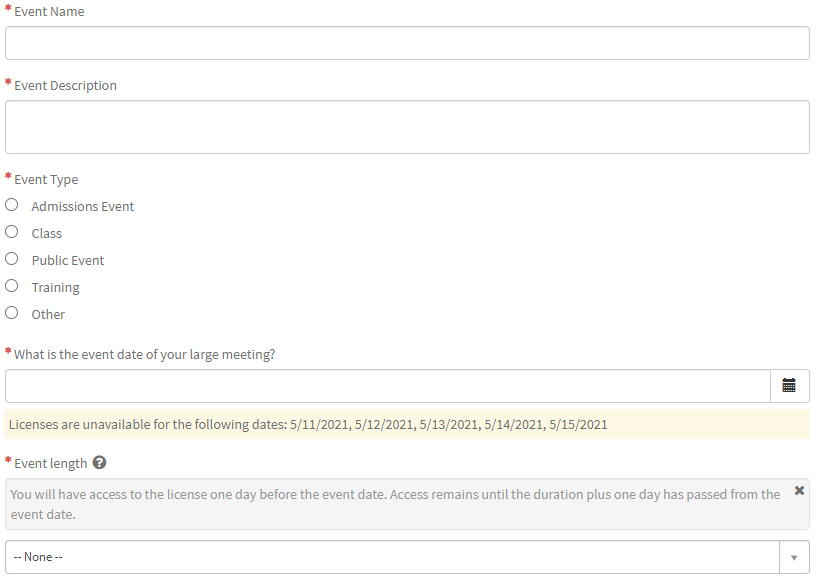
Large Meetings are your standard Zoom meetings, where everyone meets with video, audio, screen sharing, and a plethora of collaboration features, but on a larger scale. Regular Zoom meetings can have up to 300 video participants, where the Large Meeting license allows for an expanded capacity of up to 500 or 1,000 participants per meeting (based on license size). When would you want to host a Large Meeting over a Webinar? A Large Meeting is recommended when you want to provide your participants with a more collaborative and collective virtual experience, allowing them to interact with not only the hosts, but also other participants. Video Breakout Rooms also make Large Meetings ideal for teaching and training.
For any outlying questions regarding Large Meetings, please see Zoom’s Meeting Page.
For more on Webinars, please see our Webinar Page.
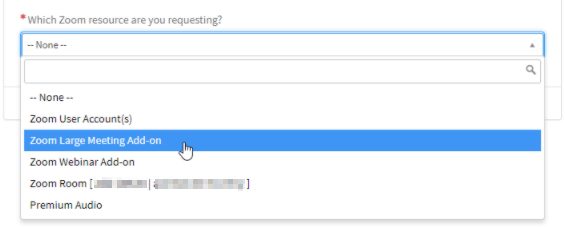
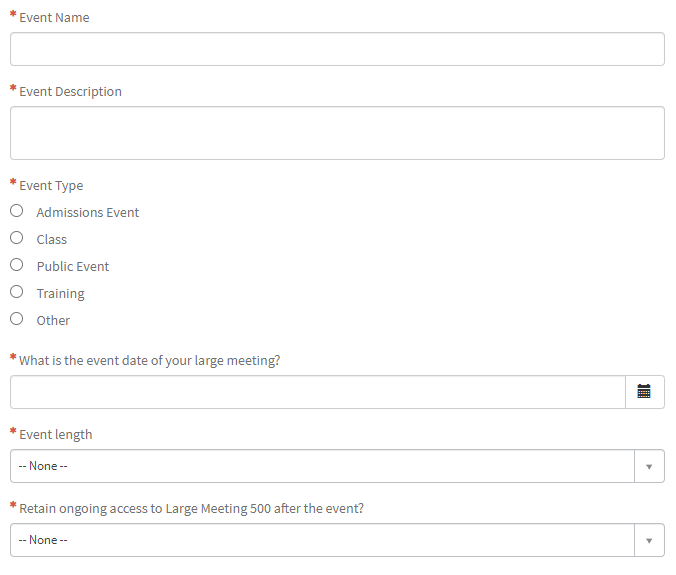
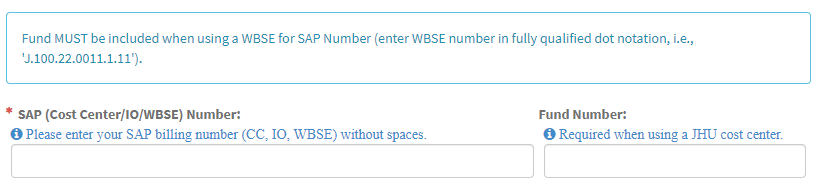
To add a Large Meeting license to your account, you can request the add-on through the IT Services Catalog.

To view Large Meeting license pricing, please see our product brochure in ServiceNow.
To cancel a Large Meeting add-on or change a cost center, please visit the Zoom Resource Management Portal.
300+ participants all talking and sharing sounds a bit unwieldy at first, but there are tools available to help manage such a large sized group.
You can find most of these features by clicking Manage Participants at the bottom of your Zoom meeting window:

There are multiple roles available for a Large Meeting: host, co-host, alternative host, and participant. The role that you have in the Large Meeting will be designated by the host.
The host is the user that scheduled the meeting. They have full permissions to manage the meeting. There can only be one host of a meeting.
Co-Hosts share most of the controls that hosts have, allowing the co-host to manage the administrative side of the meeting, such as managing participants. The host must assign a co-host during the meeting. Co-hosts cannot start a meeting. If a host needs someone else to start the meeting, they can assign an alternative host.
Alternative hosts share the same controls as co-hosts, but can also start the meeting. Hosts can assign alternative hosts when they schedule a meeting.
Participants can share their video, screen, and audio. Learn about managing participants in a meeting by visiting the Managing Participants in a Meeting page.
Large Meetings can require pre-registration before the event. The host can either automatically approve all registrants or manually approve each one. The host can add custom registration questions and generate reports on these registrations as well.
Scheduling a Large Meeting with registration will allow participants register with their e-mail, name, other questions, and custom questions, allowing you to capture more information about your participants.
You can customize the registration for Large Meetings through an array of registration options and branding.
Scheduling a Large Meeting without registration will allow participants to join without needing to sign up in advance. Participants will be required to enter their name and email address upon joining.
Zoom also allows you to schedule recurring Large Meetings with multiple occurrences, so that each occurrence uses the same meeting ID and settings. You can schedule these meetings in daily, weekly, and monthly increments. You can also set a recurring meeting to be used at any time. Meeting IDs for recurring meetings expire 365 days after the meeting was last started.
You can customize your Large Meeting registration page with a banner, logo, and event description. Users can customize these settings when you schedule a Large Meeting that requires registration.
If configured, you can live stream a Large Meeting to a custom platform. If you configure this before the Large Meeting, you can begin streaming with one click after your Large Meeting begins.
Large Meeting Reports allows users to generate different metrics and information reports including:
These reports can be exported in a .CSV format for further analysis.
For step-by-step instructions on how to extract reporting data, please see Zoom’s page on Large Meeting Reporting.
See the Large Meeting Best Practices and Resources for great tips and tricks to set up and run your Large Meeting with ease.
Please see our Zoom FAQ page for common questions about Zoom’s Large Meeting feature.
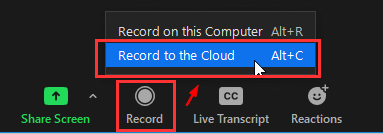
Before you can begin using the Zoom Student Cloud Recording Request form, please contact your divisional Zoom support team so they can request form access for you. Once you have been granted access, please complete the following:
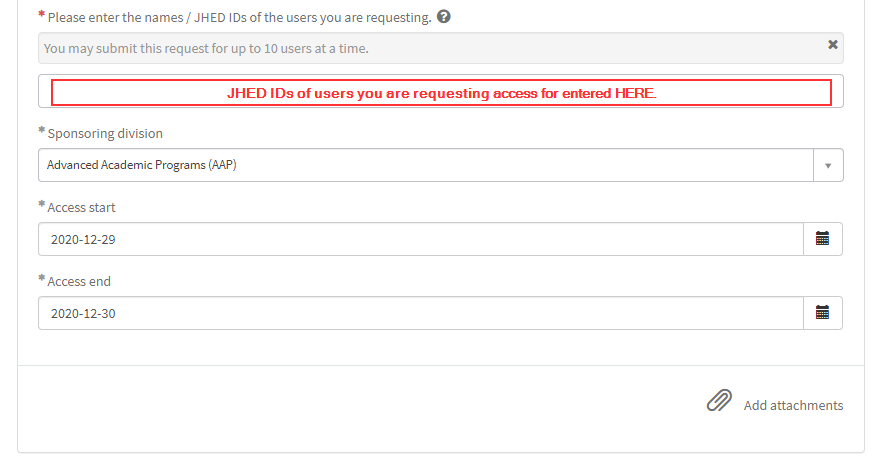
All changes and updates needed for Cloud Recording access will be made using the Zoom Student Cloud Recording Management Portal. In the portal, you are able to:
You are also able to filter the Management Portal results table by the Student’s JHED ID, Sponsoring Division, or the JHED ID of the Requestor.

Please see below for Management Portal table column definitions/explanations.
– IMPORTANT: You must click the blue Save Changes button at the top of the portal for all changes to applied. Any changes made will trigger an email notification both to you and the student that you modified.
| Management Portal Column | Definition/Explanation | How to Modify |
|---|---|---|
| Remove Access | Immediately remove Cloud Recording access, despite the Access Start and End Dates. | Click the X on the for the student you wish to inactivate. Once finished, click Save Changes to save this update. |
| Student | Student’s name. | N/A |
| JHED | JHED ID of the student. | N/A |
| Status | Status reflects the current state of the student’s access.
|
Status changes based on Access Start and End dates. |
| Access Start | The date which Cloud Recording access is granted. | Click the pencil for the Access Start Date you wish to change. Click the calendar icon to select a new date and click the green check mark to apply. Once finished, click Save Changes to save this update. |
| Access End | The date which Cloud Recording access is removed. | Click the pencil for the Access End Date you wish to change. Click the calendar icon to select a new date and click the green check mark to apply. Once finished, click Save Changes to save this update. |
| Sponsoring Division | Division which the student is apart of. | Click the pencil for the Sponsoring Division you wish to change. Select the appropriate divisions and click the green check mark to apply. Once finished, click Save Changes to save this update. |
| Requested by | Staff who requested access. | N/A |
– Please Note: Student cloud recordings will continue to remain in the Blue Jays Student instance once their access has expired. However, if the student needs to view or download the recordings after access expiration, the school/division will need to re-provision access to the student.
Support documentation for using Cloud Recording as a student is available. Please visit Guide to Cloud Recording for Students.
Please refer to our Cloud Recording for Students FAQ.
Please refer to the table below for the appropriate divisional contact to request Cloud Recording access. If you are a TA, please first contact your instructor. In your request, you should include your name, role within the division, and reason for needing Cloud Recording access. A staff member within the division will then contact you stating that you have been granted or denied access.
| School/Division | Support Contact |
|---|---|
| Advanced Academic Programs (AAP) | [email protected] |
| Carey Business School | [email protected] |
| Center for Talented Youth (CTY) | [email protected] |
| Krieger School of Arts and Sciences (KSAS) | [email protected] |
| Peabody Institute | Peabody Help Desk |
| School of Advanced International Studies (SAIS) | [email protected] |
| School of Education (SOE) | [email protected] |
| School of Medicine (SOM) | Zoom Support – JHU SOM Office of Information Technology |
| School of Nursing (SON) | [email protected] |
| School of Public Health (SPH) |
|
| Whiting School of Engineering (WSE) | [email protected] |

– Please Note: If you are supposed to have Cloud Recording access and the feature is not toggled on for your account, please contact [email protected].
You can also visit Zoom’s support site for more on how to use Cloud Recording.
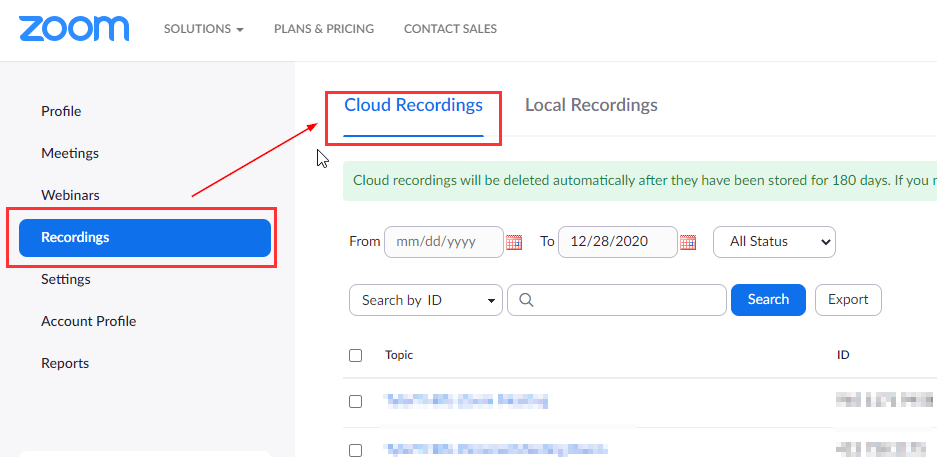
– Please Note: Cloud Recordings are automatically deleted after 180 days. You will need to download them locally before they are automatically deleted if you wish to retain a copy. Zoom will send you a reminder email before the deletion occurs.
Cloud Recording access will automatically expire based on the access end date set by your school/division. Before your access ends, you should download all of your recordings locally to your machine. See below for instructions on uploading the recordings to Panopto.
– Please Note: Your cloud recordings will continue to remain in the Blue Jays Student instance once your access has expired. However, if you need to view or download the recordings after access expiration, you will need to re-request access from your school/division.
To upload your cloud recordings to Panopto, follow the CER’s guide, Using Panopto for Zoom Recordings.
For any questions regarding Panopto, contact the CER directly.
Please refer to our Cloud Recording FAQs.
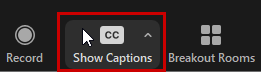
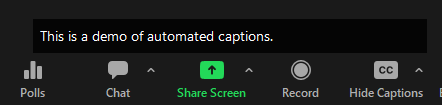
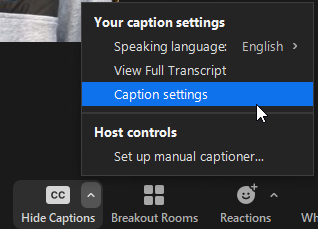
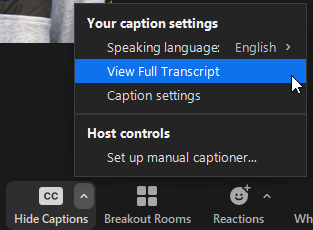
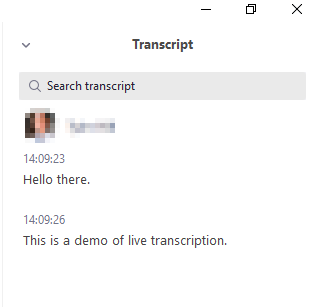
Zoom’s Automated Captioning feature (also known as Live Transcription) automatically transcribes the audio and speech from a Zoom meeting or webinar to text for participants to view during the session. If this feature is enabled on the host’s Zoom account, meeting/webinar participants can choose whether they wish to view the captions in the session.
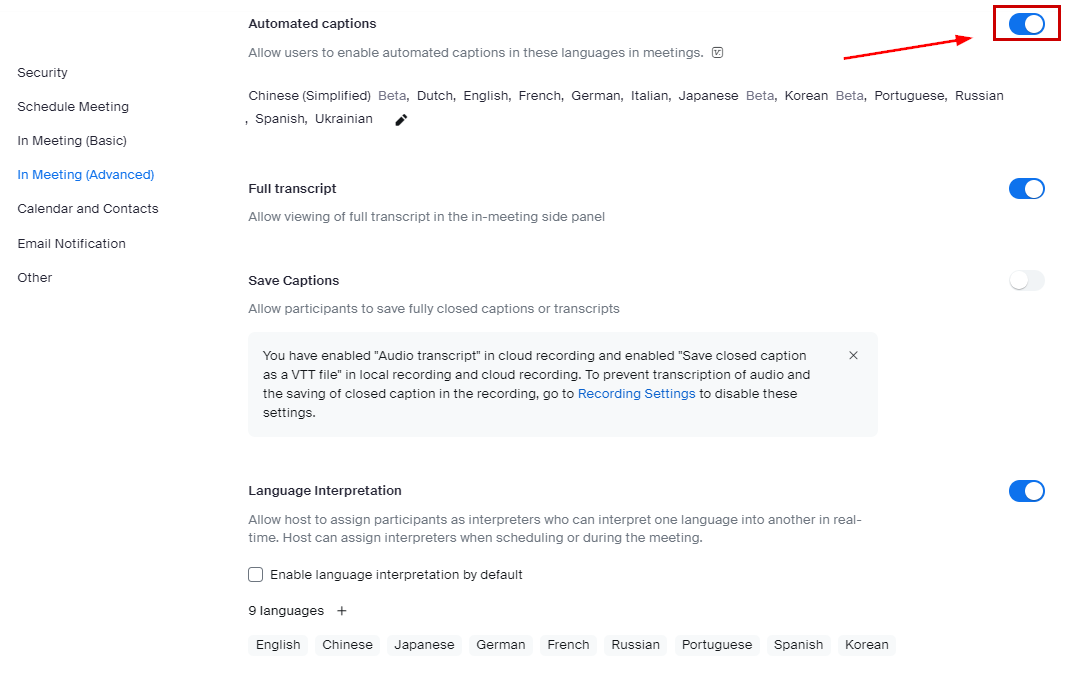

– Please Note: If this setting is enabled, participants will also have the ability to save a copy of the transcript. This setting enables the saving functionality for both the host and participants.
While you do have access to utilize the Automated Captions feature, there are a few restrictions to ensure HIPAA-compliance.
The Save Captions setting will be disabled and locked by admin to ensure that meeting participants cannot save their own copy of the transcript:

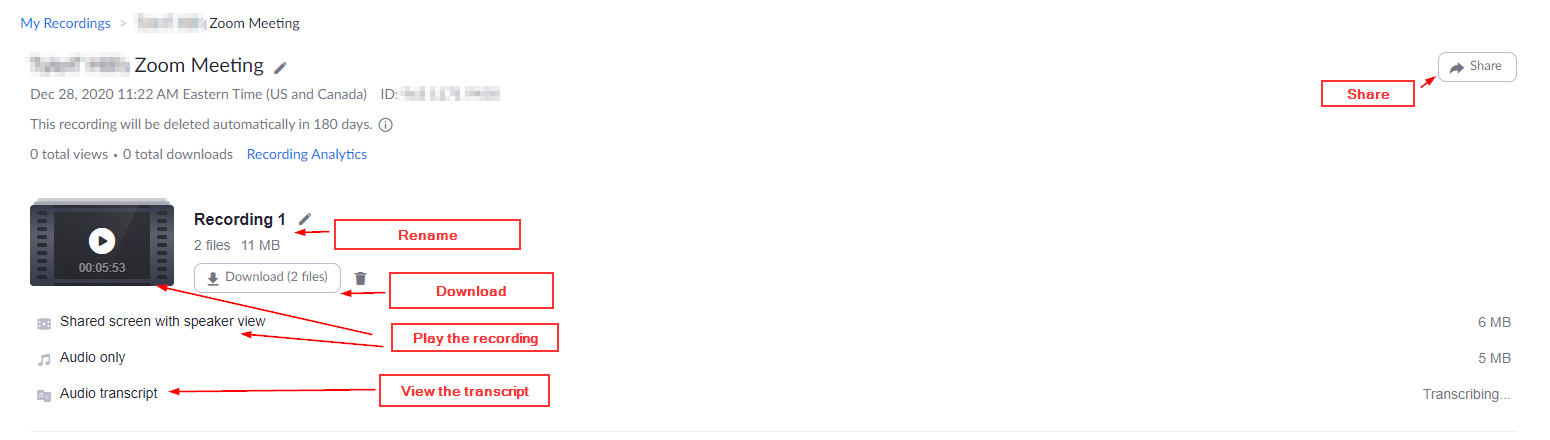
– Please Note: If you are recording the session locally (as the host or as a participant), a copy of the transcript (.txt file) will be included in the same folder as the recording. If there are no other participants in the session with you, no copy will be provided.

– Please Note: If you are recording the session (as the host or as a participant), a copy of the transcript (.txt file) will be included in the same folder as the recording. If there are no other participants in the session with you, no copy will be provided.
– Please Note: You will only see the transcript from the point in which you joined the Zoom meeting or webinar and will not be able to see any prior transcription or captions.
In addition to Automated Captions, Zoom also offers the ability for the host to assign a designated “closed captioner”. This meeting attendee is then responsible for manually typing/entering the captions as the session progresses. For more details, please visit Zoom’s Managing and viewing closed captioning page.
Please note the following:
Please visit our Zoom FAQ page.
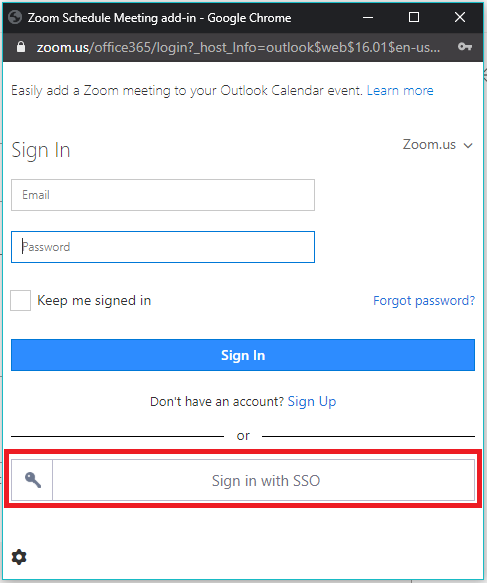
See Zoom’s Outlook add-in documentation for how to install the add-in. Scroll down to the Outlook 2013 or 2016 (desktop app) section. This section also includes instructions on how to schedule a meeting and how to view or edit your meetings.
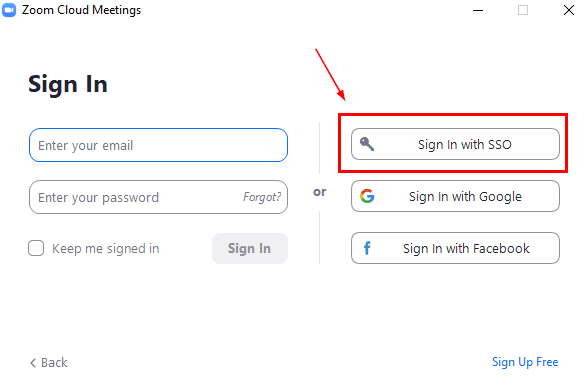
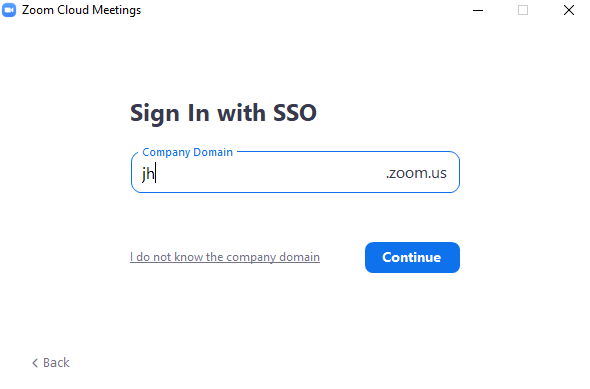
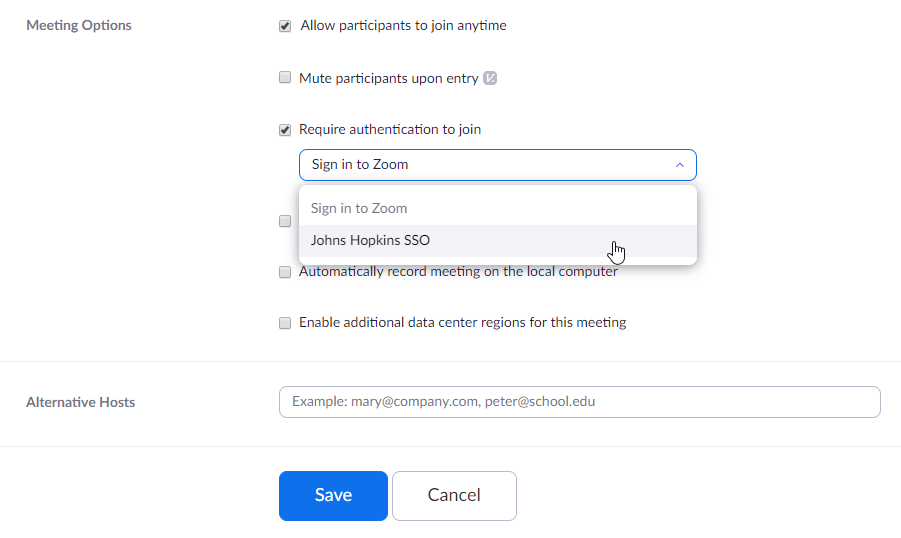
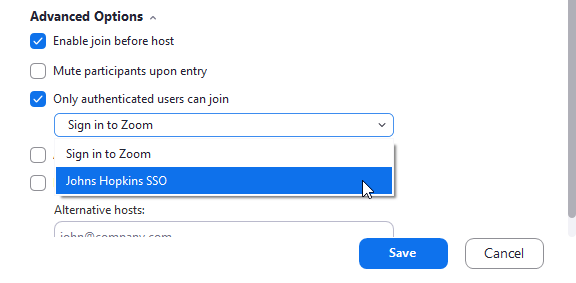
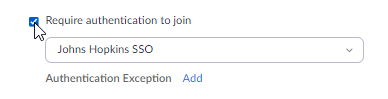
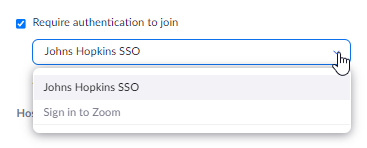
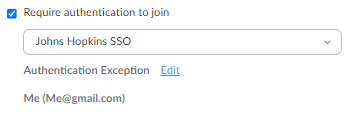
To sign in, click the Sign in with SSO button. Then enter “jh” for the company domain, and click the Continue button.

Need to take your interviews online? Try using Zoom!
The following options outline how to transition in-person interview days/weeks into an online format. This is from the perspective of the interview coordinator. Please review the following to find out what format may best suit your needs.
| Option | Pros | Cons |
|---|---|---|
| Option 1: Create a Meeting Per Candidate |
|
|
| Option 2: Create a Meeting Per Interviewer |
|
|
| Option 3: Using Breakout Rooms |
|
|
Organize every aspect using a spreadsheet. This should include breaks, discussion time, group activities, and any opening/closing sessions. Here’s a sample!
Set your both your Interviewers & Candidates up for success:
Set up a few practice sessions with your team, and have enough participants to make it seem “realistic”.
At the very least, if you cannot find a time to practice that works for all the the interviewers, ensure the interviews know how to log in, get to their meeting, and can operate the Waiting Room (if you go with Option 2).
With enough practice, the event should go off without any issues.
For Example: The meeting you are joining has a Meeting ID of 6672087529, you would enter a URL https://zoom.us/wc/join/6672087529.
You can review the recorded training at your convenience.
Have any questions? Reach out to your JH Zoom Team.
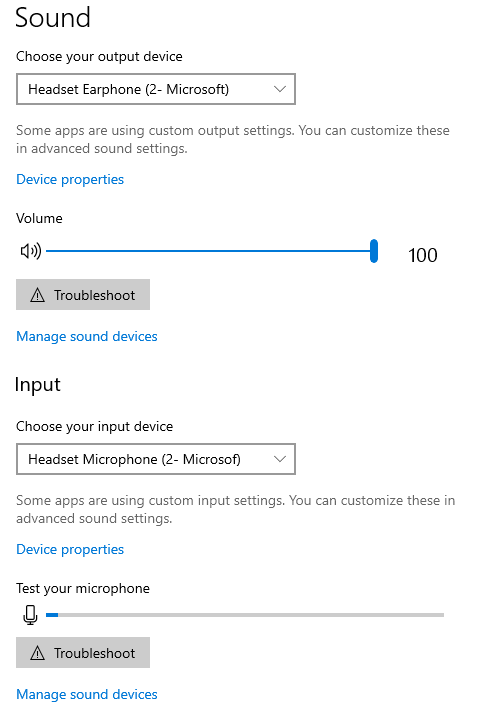
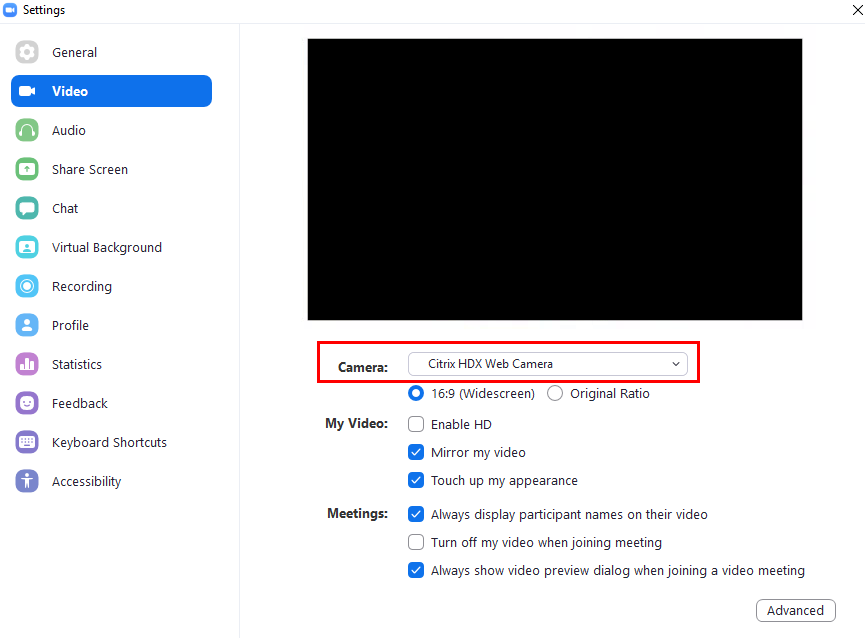
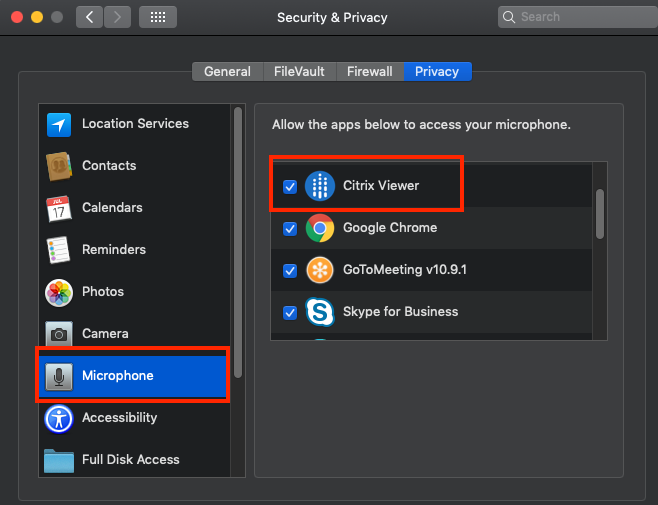
The Virtual Desktop (VDI), also known as Hopkins MyCloud, is a virtual desktop (Citrix) thin-client implementation that lets you access pre-installed JH software from your Mac or PC. Zoom, one of the installed applications, offers similar features and functionality when compared to both the desktop and web clients.
To ensure that you can properly present your video and hear and speak to your participants, you must allow the Citrix receiver to access your local devices and configure them accordingly.

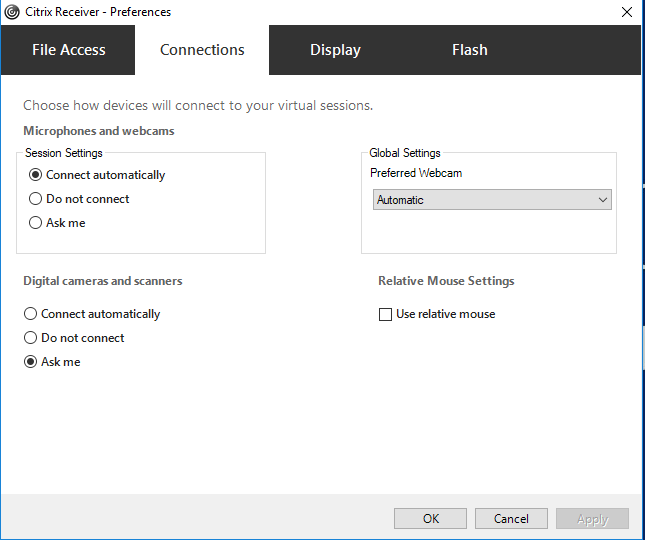

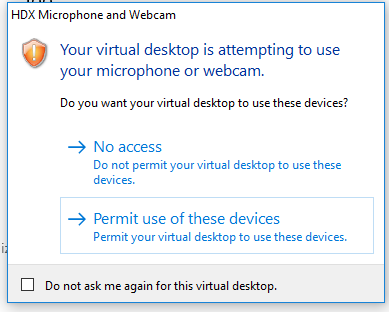

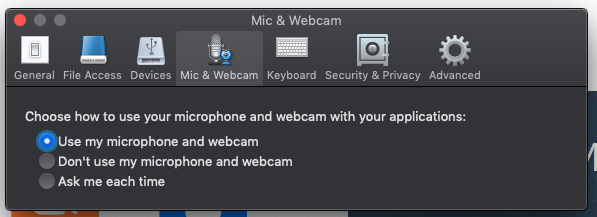
Please note: For OS X 10.14 or later, you also need to ensure Citrix Viewer has permissions to access your Camera and Microphone.

There are known functionality limitations between the Zoom desktop client and the version available within MyCloud Desktop. For example, blurred or background pictures are not supported.
For a list of MyCloud Desktop Zoom limitations, check out the knowledge base article Audio and Video Best Practices (note: link requires JH Authentication). Within the article, there are resources available that outline the limitations.
If you are still unable to successfully set up your audio and video for Zoom after viewing this guide, please contact the VDI team by visiting Support Assistance for Hopkins MyCloud Desktop.
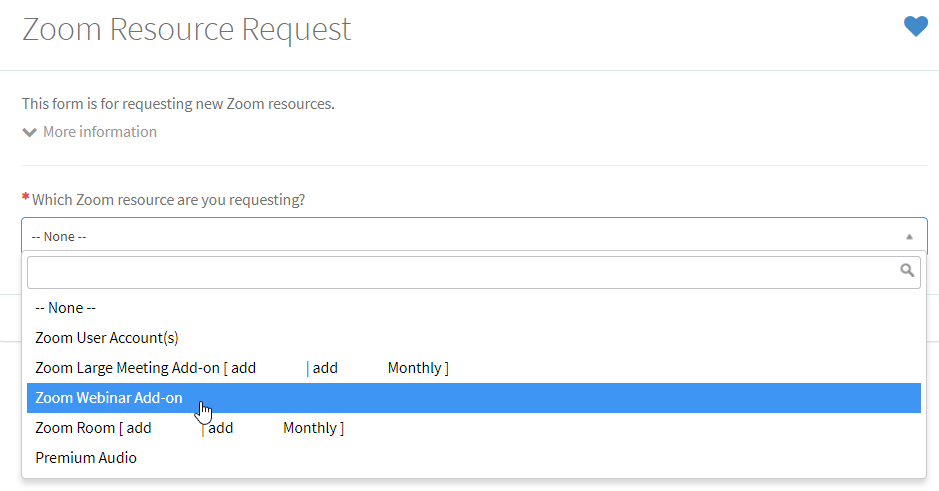
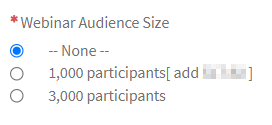
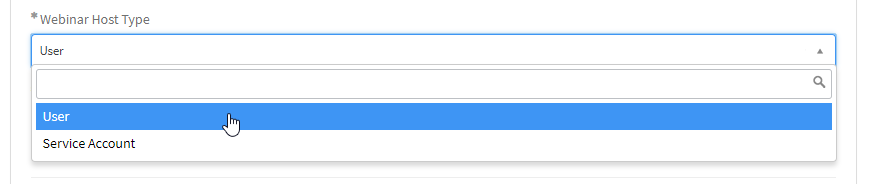
Zoom Video Webinar allows you to broadcast a Zoom meeting to up to 3,000 view-only attendees, depending on the size of your webinar license. Webinar licenses are offered at capacities of 1,000 and 3,000 participants. As the host or a panelist, you can share your screen, video, and audio in a webinar and attendees can use the chat and/or Q&A features to interact with the host and panelists.
For any outlying questions regarding Webinars, please see Zoom’s Webinar Page.
For more on Large Meetings please see our Large Meeting Page.
To add a Webinar license to your account, you can request the add-on through the IT Services Catalog.

For Webinar license pricing, please see our product brochure in ServiceNow.
To cancel a webinar add-on or change a cost center, please visit the Zoom Resource Management Portal.
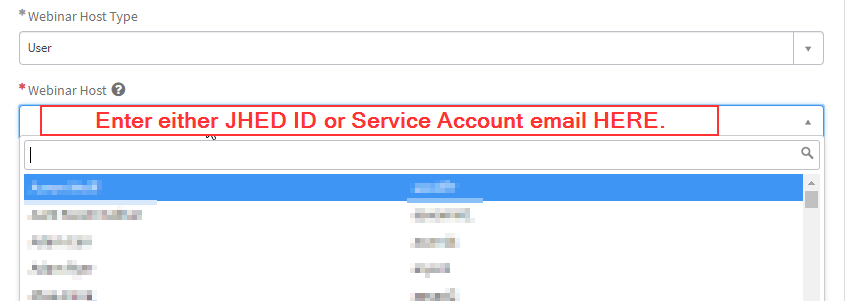
There are multiple roles available for a webinar: host, co-host, panelist, and attendee. The role that you have in the webinar will be designated by the host.
The host of the webinar is the user who the webinar is scheduled under. They have full permissions to manage the webinar, panelists, and attendees. There can only be one host of a webinar. The host has various in-session controls, such as stopping and starting the webinar, muting panelists, disabling panelists’ video, removing attendees from the webinar, and more.
Co-hosts share many of the controls that hosts have, allowing the co-host to manage the administrative side of the webinar, such as managing attendees or starting/stopping the recording. The host must assign a co-host. Co-hosts cannot start a webinar. If the host needs another Zoom user to start the webinar, they can assign this person as an alternative host.
Panelists are full participants in a webinar. They can view and share video, screen share, annotate, speak to the attendees, and more. You must be assigned panelist permissions by the webinar host. The host can also disable some features for panelists, including starting video, sharing your screen, and recording. Panelists can be invited to participate in the webinar using only their name and an email address, a Zoom account is not required.
Attendees are view-only participants who can be un-muted if the host chooses. Their view of the webinar is controlled by the host. They can interact with the host and the panelists through the Q&A and chat features. Learn about joining a webinar as an attendee by visiting Joining and Participating in a Webinar (attendee).
For more on how to manage attendees and panelists, please see Zoom’s support page on Managing attendees and panelists in a webinar.
Webinars can require pre-registration before the event. The host can either automatically approve all registrants or manually approve each one. The host can add custom registration questions and generate reports on these registrations as well.
Scheduling a Webinar with registration requires your registrants to complete a brief form before receiving the link to join your webinar. This allows you to collect the names, email addresses, and other information from the registrants. You can choose to automatically approve anyone who registers or manually approve attendees.
With Webinar registration, registrants can be imported via CSV and automatically approved. Once they have successfully been imported, a confirmation email will be sent to the registrants.
You can customize the registration for webinars, by approving attendees, enabling email notifications for registrations, adding registration questions, and more.
Scheduling a webinar without registration will allow attendees to join without needing to sign up in advance. Attendees will be required to enter their name and email address upon joining.
Similar to a meeting, Zoom allows you to schedule recurring webinars during specific dates and times. You can schedule a webinar to occur daily, weekly, or monthly.
You can customize your webinar registration page with a color scheme, title, banner, logo, and speaker information, including descriptions and profile pictures for up to three speakers. Users can customize these settings when you schedule a webinar that requires registration. Customizable settings for webinars include:
With webinar branding, you can customize the emails sent out to the panelists, registrants, attendees, and absentees of the webinar.
If configured, you can live stream a webinar to a custom platform. If you configure this before the webinar, you can begin streaming with one click after your webinar begins.
The Question & Answer (Q&A) feature allows attendees to ask questions during the webinar and for the panelists, co-hosts, and host to answer their questions. Answers can be provided by typing in the answers or choosing to “answer live”. With the public Q&A feature enabled, attendees can answer each other’s questions and also up-vote each other’s questions.
The Chat feature allows webinar attendees, the host, co-hosts, and panelists to communicate for the duration of the webinar. Whether attendees can chat with everyone or only the host will depend on the settings that the host has selected.
Webinar Reports allows users to generate different metric and information reports including:
These reports can be exported in a .CSV format for further analysis.
For step-by-step instructions on how to extract reporting data, please see Zoom’s page on Webinar Reporting.
See the Webinar Best Practices and Resources for great tips and tricks to set up and run your webinar with ease.
A Webinar Practice Session allows you and your panelists to get set up and acquainted with Zoom webinar controls before starting your webinar. The practice session can only be started by the host or alternative host. Attendees do not partake in the practice session.
Please see our Zoom FAQ page for common questions about Zoom’s Webinar feature.
In recent times, there have been numerous reported cases of “Zoombombing” during class sessions and other online meetings. “Zoombombing” refers to an uninvited guest or guests gaining access to a session, in which they typically share racist, misogynistic, and/or vulgar content via Zoom’s in-meeting features such as screen sharing and chat. To help prevent these scenarios, please refer to the settings and in-meeting host controls listed below to further secure your online sessions.
To access and utilize the newest settings and security features provided by Zoom, it is important to have the latest version of their desktop client. Additionally, please take the time to review Zoom’s release notes as they contain important updates, setting changes, and other feature/enhancement announcements.
Please review Zoom’s support page for checking your desktop client version or follow the steps below:
Zoom’s most recent release notes can be viewed by visiting their Release Notes page.
The new security icon found in your meeting controls allows both the host and co-host to enable and disable features during the meeting to further secure the session and minimize potential disruption. While most of these features can be controlled from your user settings (which applies to all meetings by default), the security icon combines them all in one place for easy access during your online sessions.
![]()
The host or co-host has the ability to hide all profile pictures of the participants in the session by enabling this feature. This may reduce distractions during the meeting.
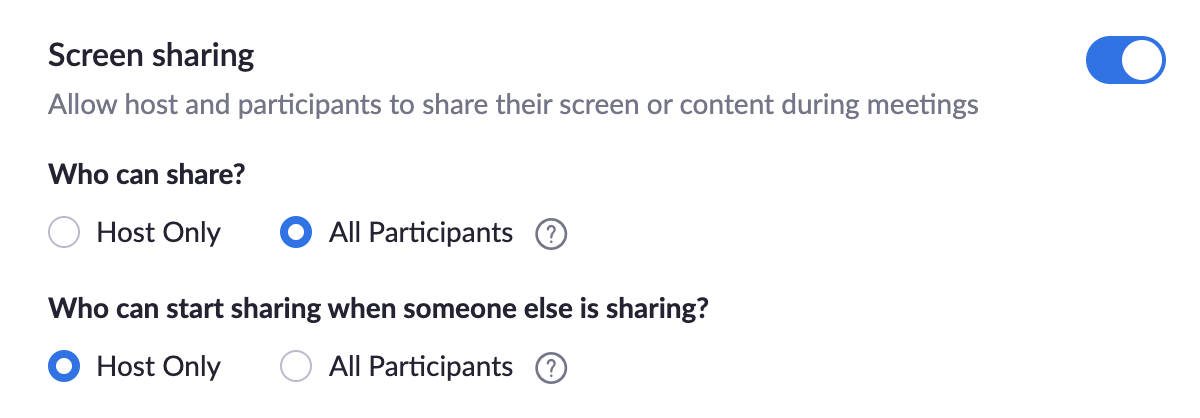
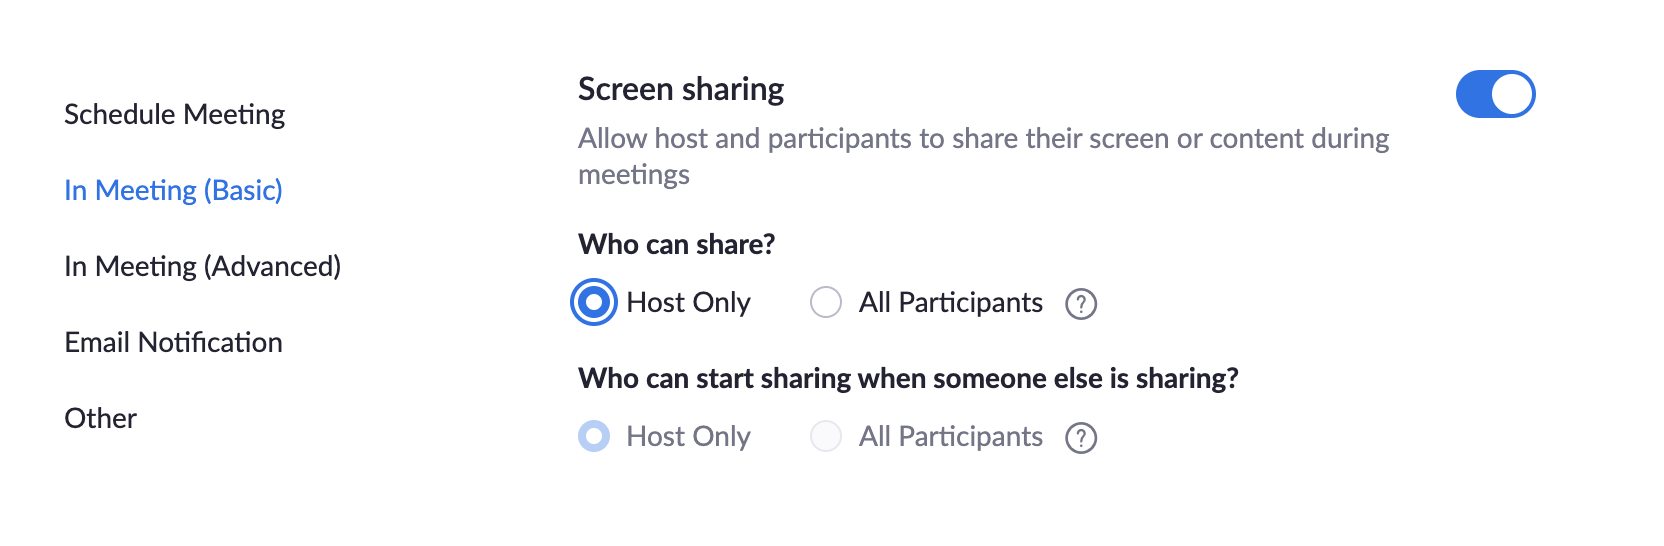
Share Screen – Allows your participants to share their computer screens.
Chat – Allows your participants to use the built-in chat window.
Rename Themselves – Allows your participants to rename themselves from the Participants panel.
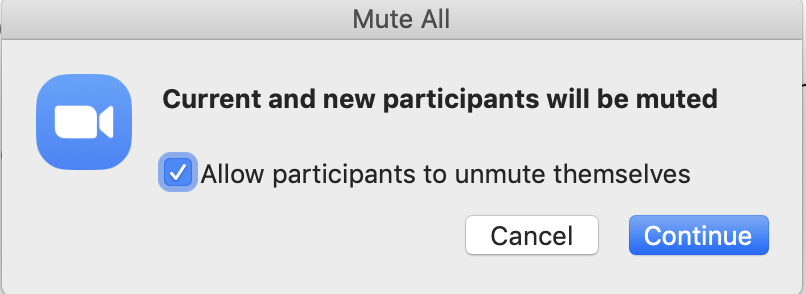
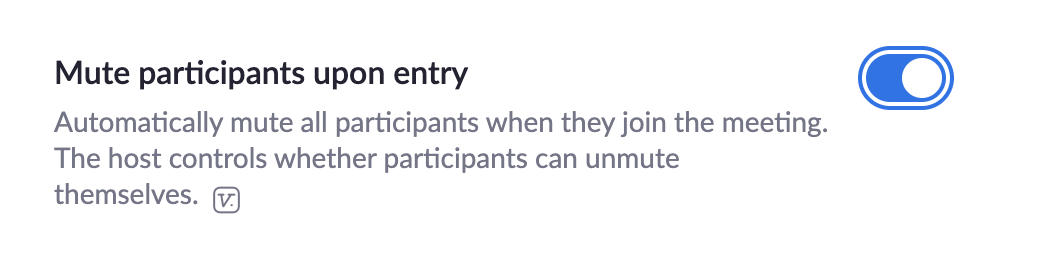
Unmute Themselves – Allows your participants to unmute themselves during the meeting.
Annotate on Shared Content (only available when sharing content) – Allows your participants to annotate on your shared screen. Attendees can draw, add text, stamps, and more. For more information on the annotation tools, please refer to using annotation tools.
With the Remove Participant feature, the host or co-host can dismiss a participant from the meeting. The user(s) removed will not be able to rejoin unless you have the “Allow removed participants to rejoin” setting enabled. Once you select “Remove Participant…”, a red Remove button will be displayed next to each participant in the list. Click this button to dismiss that particular attendee.
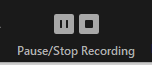
Clicking “Suspend Participants Activities” will stop all video, audio, in-meeting chat, annotation, screen sharing, and recording during that time, and Breakout Rooms will end. You will then have the option to report a participant, should you need to.
As part of Zoom’s new in-meeting security features, the host and/or co-host can now report a particular participant during a meeting. The meeting host/co-host will be able to select which participants they’d like to report, including any written details on why they are being reported, as well as any applicable attachments. The report will then be sent to the Zoom Trust and Safety team to evaluate any misuse of the platform and block the user if deemed necessary.
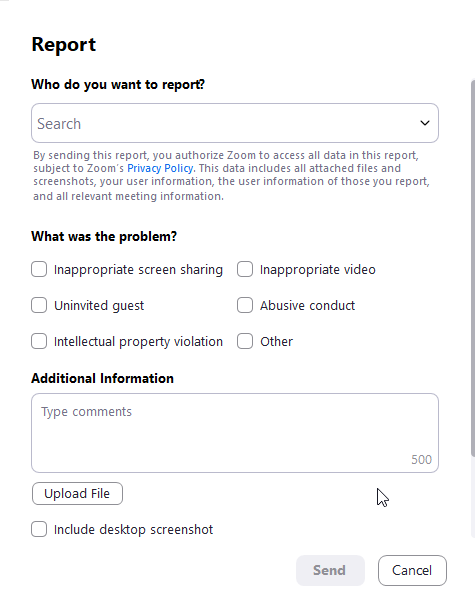
Please refer to Zoom’s support page for Reporting Participants for more information on reporting a participant during a meeting.
To report a participant after the meeting has concluded, please report the incident to Johns Hopkins corporate security, [email protected], and Zoom’s Trust and Safety team by completing the steps provided at reporting abusive behavior.
To report a matter involving discrimination, harassment or sexual misconduct to the University, please contact the Office of Institutional Equity (OIE), Wyman Park Building, Suite 515, 3400 North Charles Street, Baltimore, Maryland 21218; Telephone: (410) 516‐8075, (TTY): 711, MD Relay; E-mail: [email protected]. To learn more about OIE, the Sexual Misconduct Policy and Procedures, or the Discrimination and Harassment Policy and Procedures, please visit https://oie.jhu.edu/.
These settings are configured via the Host and Co-Host controls during a meeting.
These settings are typically configured during the creation of a meeting or under your user settings.
Web Client:
Desktop Client:


The Zoom webinar feature allows you to broadcast a Zoom session meeting with up to 3,000 view-only attendees, depending on your license size. Since the attendees are view-only, they cannot share video, audio, or interact with any of the other participants, reducing the possibility for a distraction or disruption from an unwanted guest. Participants can only interact with the hosts, co-hosts, and panelists through the Q&A and Chat features (if enabled). Only the host, co-hosts, and panelists are able to share audio, video, screens, and more during the session.
The meeting platform typically yields a more interactive and collaborative session where attendees may need to participate and engage in the dialogue. The webinar platform is better suited for presentation-style sessions, such as lectures.
To learn more about the webinar feature, how to request a license, as well as other related information, please visit the Zoom Webinar Feature page.