Background
In recent times, there have been numerous reported cases of “Zoombombing” during class sessions and other online meetings. “Zoombombing” refers to an uninvited guest or guests gaining access to a session, in which they typically share racist, misogynistic, and/or vulgar content via Zoom’s in-meeting features such as screen sharing and chat. To help prevent these scenarios, please refer to the settings and in-meeting host controls listed below to further secure your online sessions.
- Desktop Client and Release Notes
- In-Meeting Security Options
- Other Host Controls During a Meeting
- Meeting Settings
- Webinar Feature
Desktop Client and Release Notes
To access and utilize the newest settings and security features provided by Zoom, it is important to have the latest version of their desktop client. Additionally, please take the time to review Zoom’s release notes as they contain important updates, setting changes, and other feature/enhancement announcements.
Checking your Desktop Client’s Version
Please review Zoom’s support page for checking your desktop client version or follow the steps below:
- Open your Zoom desktop client.
- Click on your profile picture (or initials if you do not have a profile picture set).
- Select Help and About Zoom.
- If your desktop client is up-to-date, no further action is needed. If your client is out of date, please visit the Zoom Download Center.
Release Notes
Zoom’s most recent release notes can be viewed by visiting their Release Notes page.
In-Meeting Security Options
The new security icon found in your meeting controls allows both the host and co-host to enable and disable features during the meeting to further secure the session and minimize potential disruption. While most of these features can be controlled from your user settings (which applies to all meetings by default), the security icon combines them all in one place for easy access during your online sessions.
![]()
Lock Meeting
- What does it do?
- This feature allows the host and co-host to prevent anyone else from joining the meeting, even if they have the meeting ID and passcode.
- How do you set it up?
- Simply click the Lock Meeting button and new participants will not be able to join your meeting. To unlock, click Lock Meeting again. You can also refer to Zoom’s In-Meeting Security Options (Zoom Desktop Client 4.6.10 or later)
- How secure is it?
- New participants will not be able to join the meeting.
- JHU’s Recommendation
- Lock Meeting: This feature is ideal for meetings where the host wants to prevent interruptions or where sensitive information may be shared.
Waiting Room
- What does it do?
- The Waiting Room feature allows the host to control when a participant joins the meeting. As the meeting host, you can admit attendees one by one or hold all attendees in the waiting room and admit them all at once. When this feature is enabled, you will have a “Waiting Room” section under your participants list. From there, you can admit the participants into your meeting.
- How do you set it up?
- First, you will need to click Enable Waiting Room to activate it.
- Once selected, you will have to manage the Waiting Room throughout the duration of the meeting in case of late comers or drops needing re-entry. You can find the Waiting Room under the participant list.
- Please refer to Zoom Waiting Room for more information.
- How secure is it?
- The Waiting Room feature does give more control to the host as it allows them to decide who to admit into the session.
- JHU’s Recommendation
- If you use Waiting Room, screen your attendees.
Hide Profile Pictures
The host or co-host has the ability to hide all profile pictures of the participants in the session by enabling this feature. This may reduce distractions during the meeting.
Allow Participants to… (when selected)
Share Screen – Allows your participants to share their computer screens.
Chat – Allows your participants to use the built-in chat window.
Rename Themselves – Allows your participants to rename themselves from the Participants panel.
Unmute Themselves – Allows your participants to unmute themselves during the meeting.
Annotate on Shared Content (only available when sharing content) – Allows your participants to annotate on your shared screen. Attendees can draw, add text, stamps, and more. For more information on the annotation tools, please refer to using annotation tools.
Remove Participant
With the Remove Participant feature, the host or co-host can dismiss a participant from the meeting. The user(s) removed will not be able to rejoin unless you have the “Allow removed participants to rejoin” setting enabled. Once you select “Remove Participant…”, a red Remove button will be displayed next to each participant in the list. Click this button to dismiss that particular attendee.
Suspend Participants Activities
Clicking “Suspend Participants Activities” will stop all video, audio, in-meeting chat, annotation, screen sharing, and recording during that time, and Breakout Rooms will end. You will then have the option to report a participant, should you need to.
Report a Participant
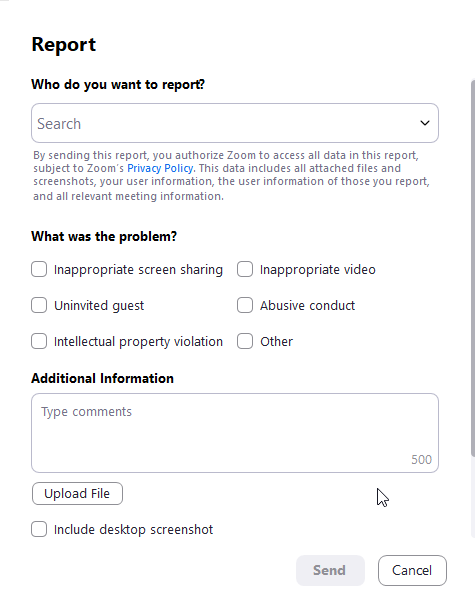
As part of Zoom’s new in-meeting security features, the host and/or co-host can now report a particular participant during a meeting. The meeting host/co-host will be able to select which participants they’d like to report, including any written details on why they are being reported, as well as any applicable attachments. The report will then be sent to the Zoom Trust and Safety team to evaluate any misuse of the platform and block the user if deemed necessary.
- During your session, click the Security icon in the meeting controls bar.
- Select Report… from the available options.
- You will then be prompted to fill out the Report Form, where you will include the name of the participant, the problem you were facing, and any additional comments and information. You can also include attachments and a screenshot of your desktop.
- Click Send when you have finished completing the report.
Please refer to Zoom’s support page for Reporting Participants for more information on reporting a participant during a meeting.
To report a participant after the meeting has concluded, please report the incident to Johns Hopkins corporate security, [email protected], and Zoom’s Trust and Safety team by completing the steps provided at reporting abusive behavior.
To report a matter involving discrimination, harassment or sexual misconduct to the University, please contact the Office of Institutional Equity (OIE), Wyman Park Building, Suite 515, 3400 North Charles Street, Baltimore, Maryland 21218; Telephone: (410) 516‐8075, (TTY): 711, MD Relay; E-mail: [email protected]. To learn more about OIE, the Sexual Misconduct Policy and Procedures, or the Discrimination and Harassment Policy and Procedures, please visit https://oie.jhu.edu/.
Other Host Controls During a Meeting
These settings are configured via the Host and Co-Host controls during a meeting.
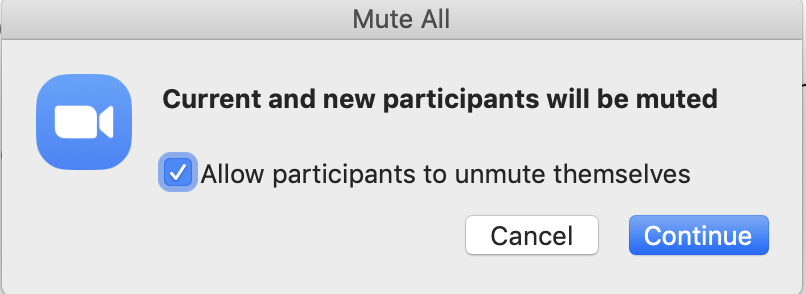
Mute All and Unmute All
- What does it do?
- You can mute all participants that are already in the meeting as well as new participants joining the meeting.
- How do you set it up?
- Please refer to Zoom’s support page for Mute All and Unmute All.
- When you mute all participants, you can also choose whether to allow them to unmute themselves. The default option is to “Allow participants to unmute themselves”.

- How secure is it?
- By default, participants can unmute themselves.
- If you choose not to “Allow participants to unmute themselves”, then when participants try to unmute, they will get prompted “You cannot unmute yourself as host has muted all attendees”.
- JHU’s Recommendation
- Mute participants upon entry: Participants can unmute themselves when it is time for them to talk.
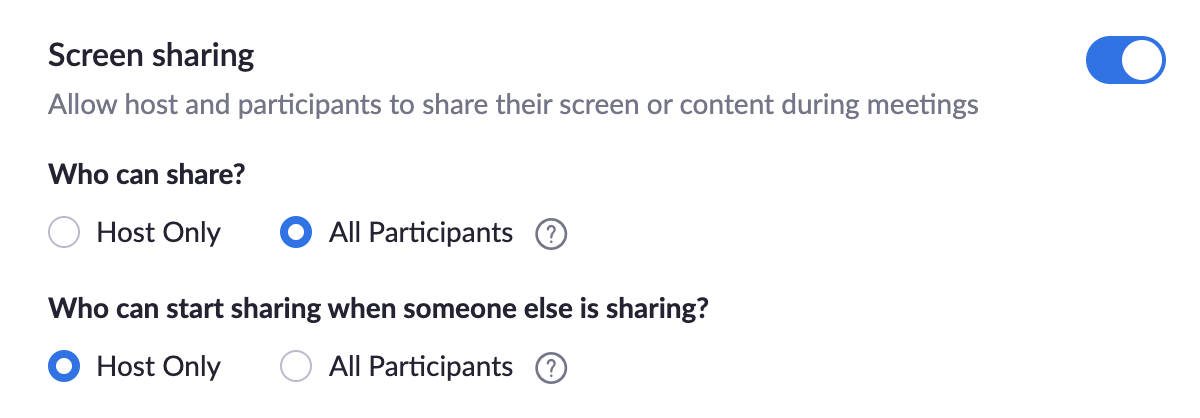
Screen Sharing
- What does it do?
- Zoom allows for screen sharing on desktop, tablet, and mobile devices running Zoom.
- The host and attendee can screen share by clicking the Share Screen icon.
- The host does not need to grant screen share access for another participant to share their screen.
- The host can prevent participants from accessing screen share.
- How do you set it up?
- During a meeting, the host can enforce Host Only sharing or allow All Participants.
- Please refer to Zoom’s support page for Host and Co-Host Controls in a Meeting
- During a meeting, scroll down to the Screen Share section.
- Screen Share controls (click the ^ next to Share Screen): Select who can share in your meeting and if you want only the host or any participant to be able to start a new share when someone is sharing.
- How secure is it?
- This change would only affect the running meeting.
- Participants, on trying to share, will be told “Only the host can share in this meeting”.
- Hosts/Co-Hosts can still automatically share.
- You could promote a participant to Co-Host temporarily during the meeting to allow them to share.
- JHU’s Recommendation
- Restrict sharing to host/co-host only: Allow participants to share as needed.
Meeting Settings
These settings are typically configured during the creation of a meeting or under your user settings.
Meeting Passcode
- What does it do?
- In November 2019, we configured our Zoom instances to require a meeting passcode (New Setting: Waiting Room and Passcode Requirement for Meetings)
- All newly scheduled Zoom meetings, instant Zoom meetings, and Personal Meeting ID (PMI) meetings (where Join Before Host is enabled) will require a passcode by default.
- The meeting passcode must meet these requirements:
- 10 characters maximum
- Passcodes are case-sensitive
- We recommend using alphanumeric characters and these special characters: @ * _ –
- The Zoom desktop client allows alphanumeric characters and these special characters: @ * _ –
- How do you set it up?
- For scheduled meetings, the meeting passcode will be in the invitation. For instant meetings, the passcode will be displayed in the Zoom Client or on the Zoom Rooms Controller. The passcode is also included in the meeting join URL. For more information, please see Zoom’s Support page on using meeting passcodes.
- How secure is it?
- The (encrypted or hashed) passcode is included in the meeting join URL
- Example: https://jhjhm.zoom.us/j/123456789?pwd=cUpYWGRHY0JicEFrTWc0L2p3aXJ5UT09
- If participants are given that meeting join URL, they can join without needing to enter the meeting passcode.
- Note, that pwd string in the URL (e.g., cUp…) is not the actual meeting passcode. This can cause confusion.
- If participants are only provided with the meeting ID (e.g., https://jhjhm.zoom.us/j/123456789 or 123-456-789), then they would be prompted to enter the meeting passcode.
- JHU’s Recommendation
- Require a passcode: For increased security to reduce the threat of “Zoombombing”, consider requiring a passcode for students to join the meeting.
- Do not share your Invitation link publicly: You can either email the link to your students or post it in your Blackboard course.
JHU SSO Authentication
- What does it do?
- JHU SSO Authentication requires that participants joining your meeting/webinar are authenticated using their JHED credentials. This will prevent unwanted guests from gaining access to your session and will further ensure that only Hopkins colleagues are joining. A Zoom account is not required for those joining.
- How do you set it up?
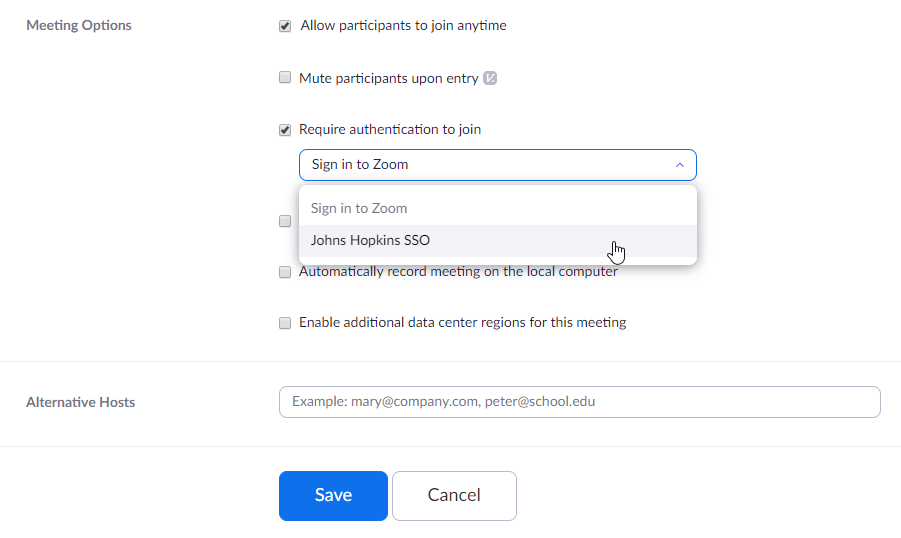
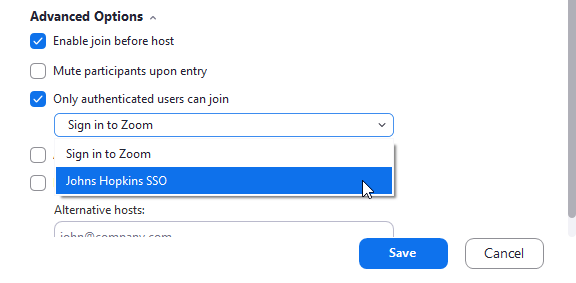
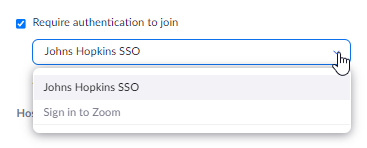
- When scheduling a meeting, select the Only authenticated users can join option. Then, select Johns Hopkins SSO from the drop down.
Web Client:
Desktop Client:
- How secure is it?
- This is set per meeting, not across all meetings, so you can have different options for different meetings depending on your use case.
- JHU SSO Authentication will prevent unwanted guests from joining. This feature will limit your meeting participants to only those who have JHED credentials.
- Without a JHED ID and password, they will not be able to enter the session.
- Allowing Exceptions
- When requiring authentication (Johns Hopkins SSO) to join a meeting, hosts can allow exceptions for guests to bypass authentication to join meetings.
- To add an exception to your meeting:
- Go to “Schedule a Meeting”
- Scroll down to “Security”
- Select “Require authentication to join”
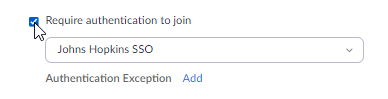
- From the drop down menu, select “Johns Hopkins SSO”
- To add an exception, click “Add”

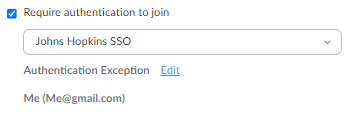
- A box will pop-up to allow the host to populate the user’s information, then click “Save”
You can add multiple users by clicking “Add Participant”.

- The host will see the user exception listed under “Authentication Exception”
- Determine per meeting whether you want to utilize JHU SSO Authentication.
- If your meeting is comprised of only Hopkins employees, we would recommend enabling this setting.
- If your meeting is comprised of guests from outside of the enterprise, we would recommend not enabling this feature and securing your meeting using another setting.
Join Before Host vs Waiting Room
- What does it do?
- Join Before Host – Allows attendees to join the meeting before the host joins or when the host cannot attend the meeting. If you select join before host, then the participants can join the meeting before the host joins or without the host.
- Waiting Room – Allows the host to control when a participant joins the meeting. As the meeting host, you can admit attendees one by one or hold all attendees in the waiting room and admit them all at once. You can choose to send all participants to the waiting room when joining your meeting, or choose to send only guests (participants who are not on your Zoom account or are not signed in).
- How do you set it up?
- Please refer to Zoom’s support pages for Join Before Host and Waiting Room.
- Note: Join Before Host does not work if Waiting Room is also enabled.
- How secure is it?
- This is set per meeting, not across all meetings, so you can have different options for different meetings depending on your use case.
- Join Before Host would not be very secure, as it is meant to let participants into a meeting without a host.
- The Waiting Room feature does give more control to the host as it allows them to decide who to admit into the session.
- JHU’s Recommendation
- Determine per meeting whether you want to utilize Join Before Host or Waiting Room.
- If you use Join Before Host, require a meeting passcode.
- If you use Waiting Room, screen your attendees.
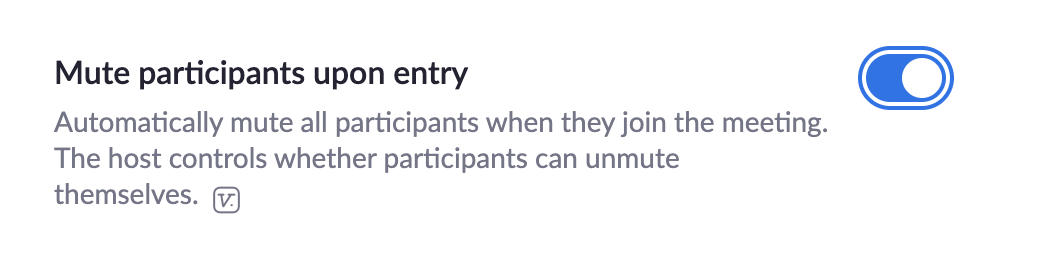
Mute Participants Upon Entry
- What does it do?
- This meeting setting will automatically mute all participants when they join the meeting. The host controls whether participants can unmute themselves.
- How do you set it up?
- Please refer to Zoom’s support page for Changing your meeting settings.
- Under Personal > Settings > Meeting tab, scroll down to Mute Participants Upon Entry.
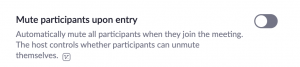
- Toggle the option from off (default) to on.

- For existing meetings, please visit Zoom’s support page for managing your meetings.
- How secure is it?
- This is set per meeting, not across all meetings, so you can have different options for different meetings depending on your use case.
- While this feature mutes participants when they initially enter the meeting, it does not prevent them from unmuting. If you want to prevent participants from unmuting, you will have to do that via in-meeting controls.
- JHU’s Recommendation
- Mute participants upon entry: Participants can unmute themselves when it is time for them to talk.

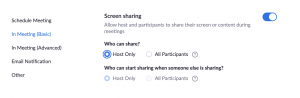
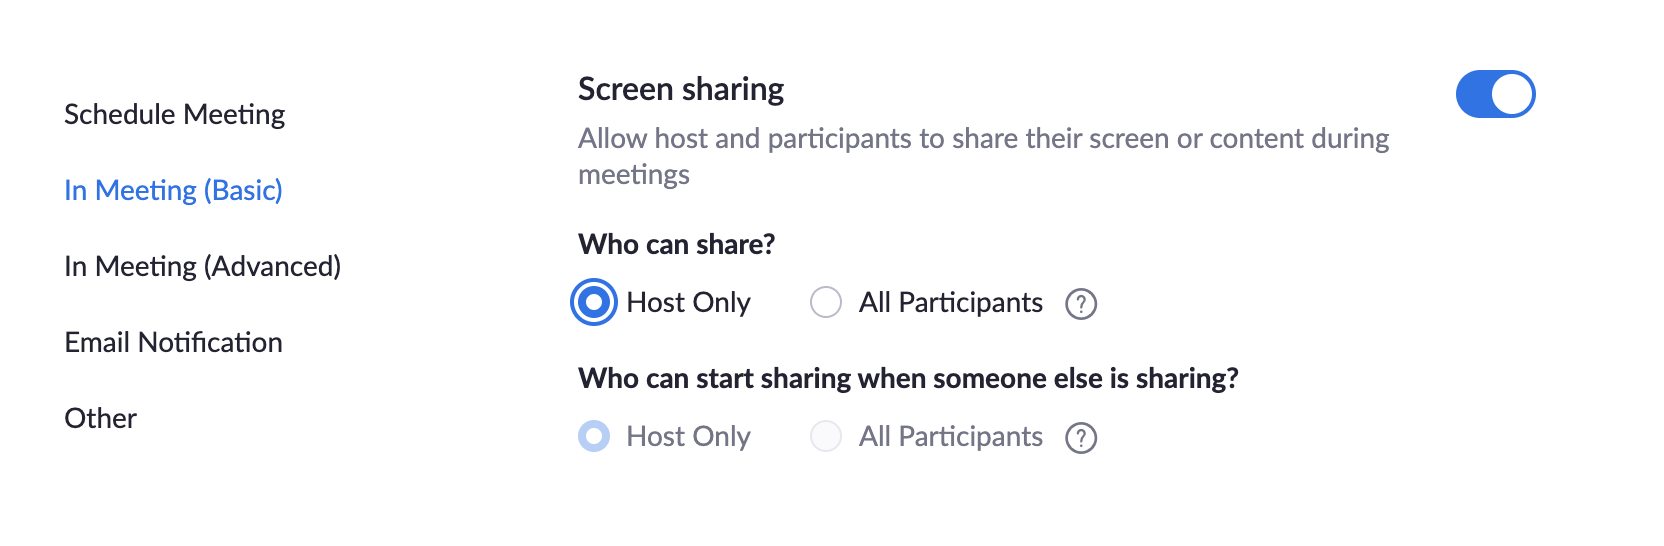
Screen Sharing – Who can Share?
- What does it do?
- Zoom allows for screen sharing on desktop, tablet, and mobile devices running Zoom.
- The host and attendee can screen share by clicking the Share Screen icon.
- The host does not need to grant screen share access for another participant to share their screen.
- The host can prevent participants from accessing screen share.
- Sharing of screen, by default, is given to All Participants upon entry into the meeting. Sharing includes Annotation and Whiteboard functionality. However, you can change this meeting default.
- How do you set it up?
- Please refer to Zoom’s support page for Changing your meeting settings.
- Under Personal > Settings > Meeting tab, scroll down to Screen Sharing.

- Change Who can share? from “All Participants” (default) to “Host Only”.
- Save the change.
- How secure is it?
- This change would affect all your existing meetings.
- Participants, on trying to share, will be told “Only the host can share in this meeting”.
- Hosts/Co-Hosts can still automatically share.
- You can change this during a meeting (see In-Meeting Screen Sharing) if you want All Participants to share.
- Or you could promote a participant to Co-Host temporarily during the meeting.
- JHU’s Recommendation
- Restrict sharing to host/co-host only: Allow participants to share as needed.
Webinar Feature
The Zoom webinar feature allows you to broadcast a Zoom session meeting with up to 3,000 view-only attendees, depending on your license size. Since the attendees are view-only, they cannot share video, audio, or interact with any of the other participants, reducing the possibility for a distraction or disruption from an unwanted guest. Participants can only interact with the hosts, co-hosts, and panelists through the Q&A and Chat features (if enabled). Only the host, co-hosts, and panelists are able to share audio, video, screens, and more during the session.
The meeting platform typically yields a more interactive and collaborative session where attendees may need to participate and engage in the dialogue. The webinar platform is better suited for presentation-style sessions, such as lectures.
To learn more about the webinar feature, how to request a license, as well as other related information, please visit the Zoom Webinar Feature page.