What is the Zoom Whiteboard?
The Zoom Whiteboard provides users a complete set of intuitive tools to collaborate together in a digital, canvas-like setting. This new feature makes it simple for both in-person and virtual teams to interact, brainstorm, and work together using a persistent and unified digital workspace.
Note: This newly released feature is separate from the legacy/classic in-meeting Zoom whiteboard.
- Zoom Whiteboard Settings
- Creating and Accessing Whiteboards
- Using Whiteboard Controls
- Sharing Whiteboards
- HIPAA/Sensitive Data Considerations
Zoom Whiteboard Settings
Before you begin to utilize the new Whiteboard in your meetings, it is recommended that you first review the settings configured in the web portal to ensure they align with your needs.
-
- Login at jh.zoom.us (students use jhubluejays.zoom.us) using your JHED credentials.
- Navigate to Settings > Whiteboard.
- Review both the In-meeting and Out-of-Meeting default settings and adjust where necessary.

Creating and Accessing Whiteboards
From the Zoom web portal
-
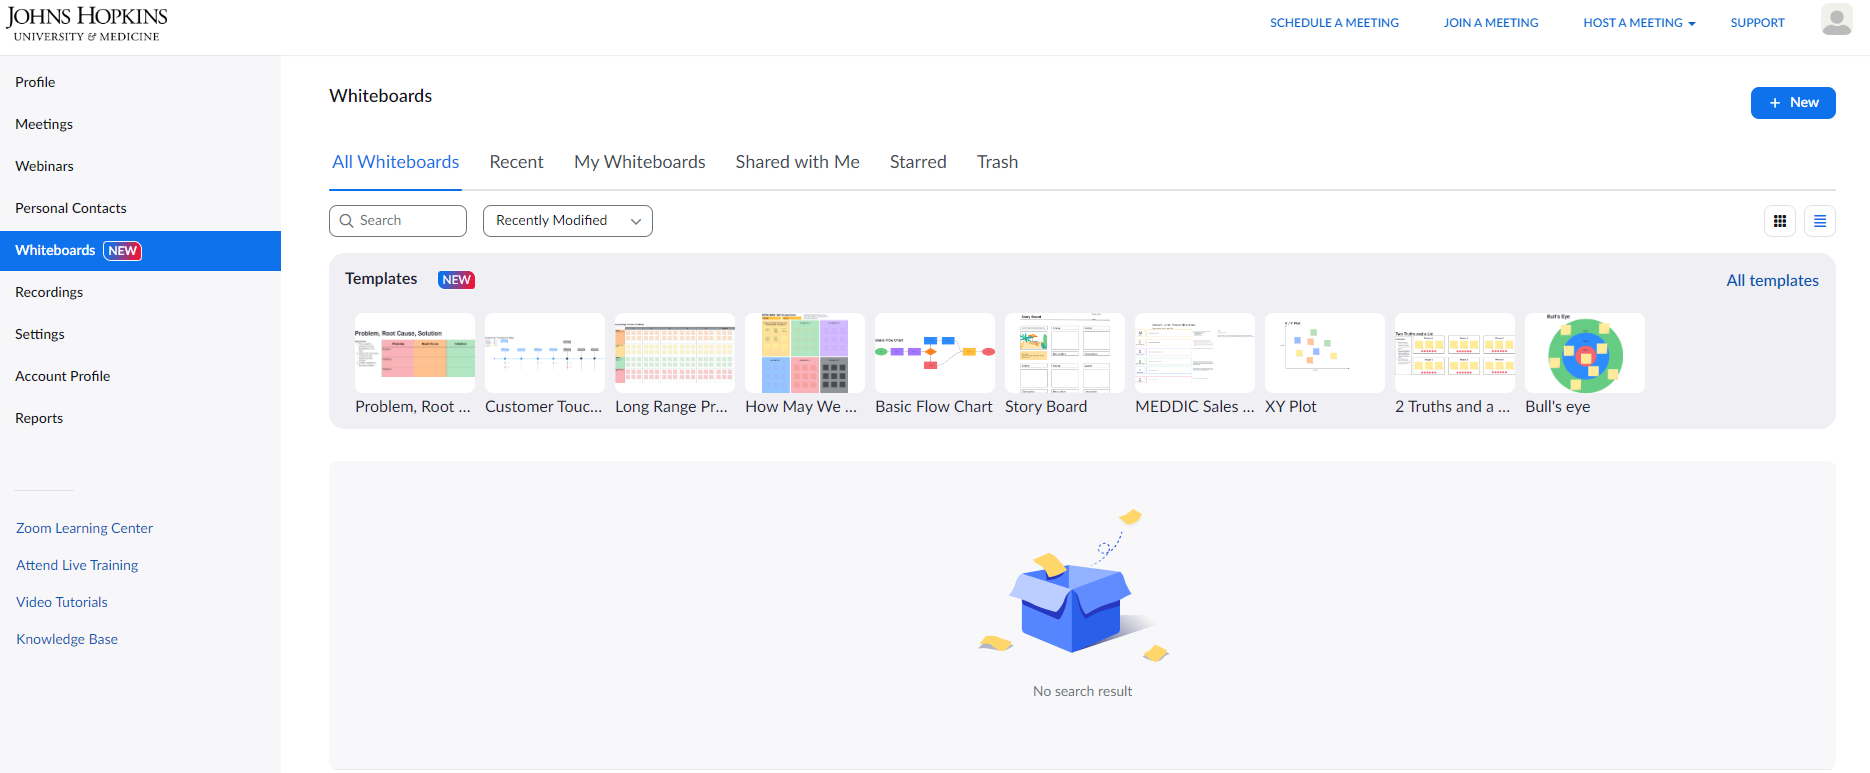
- Login at jh.zoom.us using your JHED credentials.
- Navigate to Whiteboards.
- From here, you can create a new whiteboard, select a template for a new whiteboard, view recently shared whiteboards, and more.
From a Zoom meeting or webinar
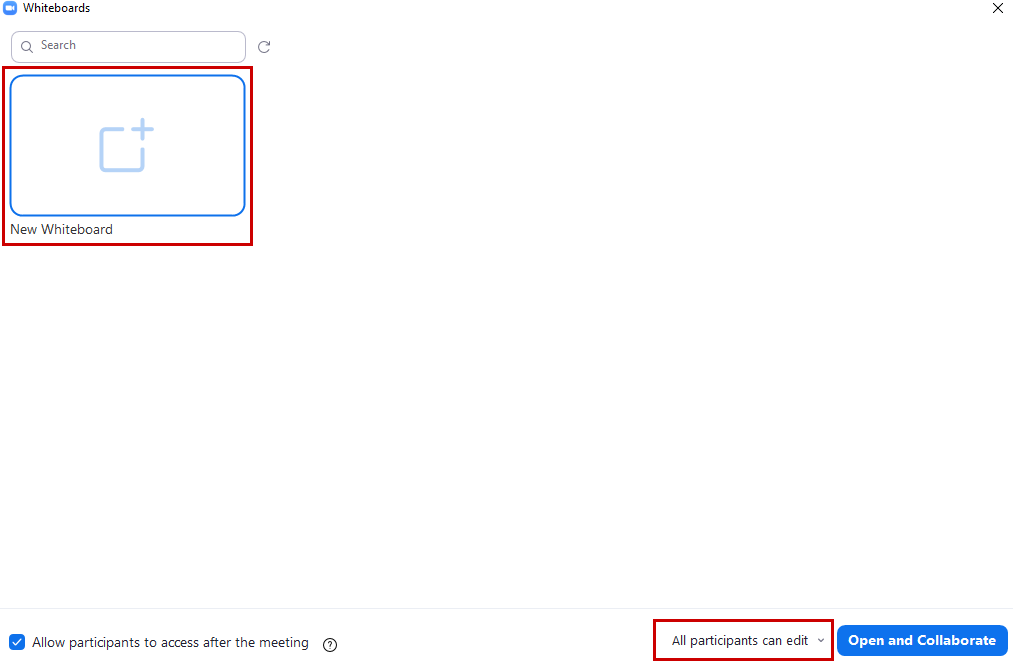
After you have started your Zoom meeting or webinar, click the Whiteboard button from the in-meeting controls bar.
![]()
- To create a new whiteboard, click the New Whiteboard option.
- Previously created whiteboards will also show in this menu item. Select the whiteboard you wish to work on.
- Select the checkbox next to Allow attendees to access after the meeting if your participants require access after the meeting.
- Click the caret next to Open and Collaborate to adjust the participants viewing/editing permissions.
- Click Open and Collaborate once you are ready to create the new whiteboard.
From the Zoom Desktop client
-
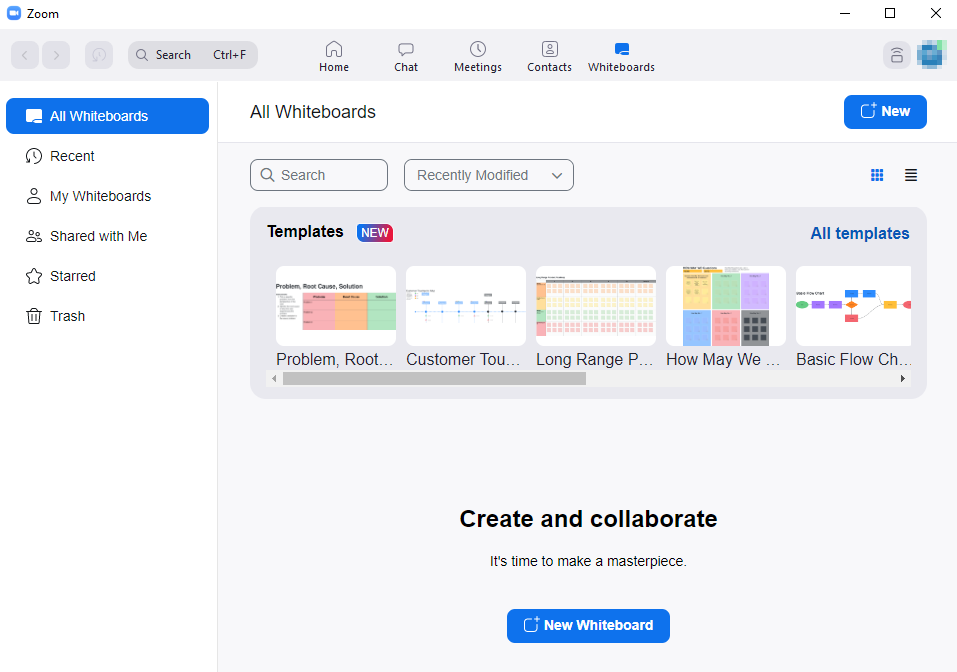
- Open and sign into the Zoom Desktop Client.
- Click the Whiteboards menu item.
- From here, you can create a new whiteboard, select a template for a new whiteboard, view recently shared whiteboards, and more.
Refer to How to create and share Zoom Whiteboards for more information.
Using Whiteboard Controls
Whiteboard tools are used to create, manipulate, and edit the objects you add to your digital canvas. For a full overview of the available Whiteboard tools and how to use them, please review the How to use the whiteboard controls guide from Zoom.
Sharing Whiteboards
Once you have created a whiteboard, you have the ability to share it directly with other users inside the Johns Hopkins organization (for those with enterprise Zoom accounts established) or with users outside the organization by email invitation or creating a shareable and reusable link.
- Click the Share button next to the whiteboard you wish to share.
- Enter the email addresses of the users you’d like to share the whiteboard with. If the user is not a member of the Johns Hopkins Zoom organization, they will be marked as “external”.
- To utilize the shareable link, click the Copy Link button and adjust the sharing/access permissions accordingly.
- Review the user role permissions when sharing whiteboards to ensure your users have the appropriate access.
Refer to How to create and share Zoom Whiteboards for more information.
– Please Note: Whiteboard Cloud sharing is not available for student accounts (jhubluejays.zoom.us). However, whiteboards can be still be exported to PDF and PNG file formats and shared accordingly.
HIPAA/Sensitive Data Considerations
The JHM, JHUSON, and JHUSOM instances of Zoom here at Johns Hopkins are HIPAA-compliant, which also extends to various Zoom features such as cloud recording, reporting, and now the Zoom Whiteboard. Zoom users are responsible for the security of the data that is collected and used within Zoom.
- Consider the nature of the data that is being collected and documented within your Zoom whiteboards. Only collect PHI and PII where absolutely necessary.
- Only share the whiteboards with users who require access and limit the number of external users when possible.
- Use the “Restricted” access permission when sharing to further limit whiteboard access. Only the users and emails who have been added directly can open the whiteboard with this option enabled. This prevents the link from being shared and utilized by other users not permitted to do so.
- When exporting and saving whiteboards locally to your computer, consider the storage location of the files.
Please familiarize yourself with the current Johns Hopkins sensitive data policies outlined below: