- Reference
- Prerequisites
- Creating the Calendar Accounts
- Enabling the Dedicated User to access Zoom Room Calendar
- Add the Calendar Resource
- Calendar Integration Validation
Reference
Prerequisites
- A Zoom room which will use an Office 365 / Exchange Online calendar
- A calendar to link to the Zoom Room (room calendar)
- An Exchange Service Account (dedicated user)
Creating the Calendar Accounts
- Create a dedicated user for Zoom to access Office 365 calendars (see Request Group Account (O365/Exchange Online)), e.g., [email protected].
- Create or locate a calendar resource for each room e.g., [email protected].
- Delegate rooms to the dedicated user or simply sign into both accounts (dedicated user, room calendar).
- Enable the dedicated user to edit the Zoom Rooms calendars.
- Email [email protected] when the above steps have been completed, and a Zoom Account Administrator will set up the calendar integration. The Zoom Account Administrator will let you know when you’re able to proceed with the below steps.
If you don’t already have an account, you’ll need to request an account from your LAN Administrator.
Enabling the Dedicated User to access Zoom Room Calendar
Once both the room calendar (Zoom Room calendar) and dedicated user have been established, you will need to grant access to the dedicated user to modify/edit the Zoom Room’s calendar. Please follow the below steps:
Example configuration:
- Dedicated User: [email protected]
- Zoom Room Calendar: [email protected]
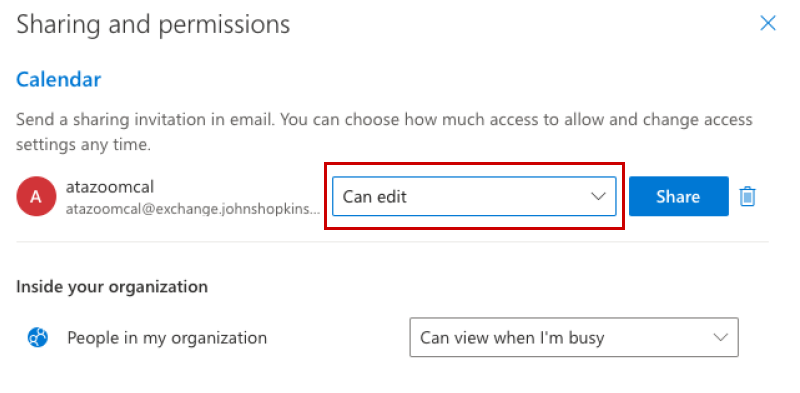
- Sign in at Outlook Web as the Zoom Room Calendar (e.g. [email protected])
- Open the Zoom Room’s Calendar
- Click the Share button
- Enter the Dedicated User’s email (e.g. [email protected])
- Choose the Can Edit option and click Share
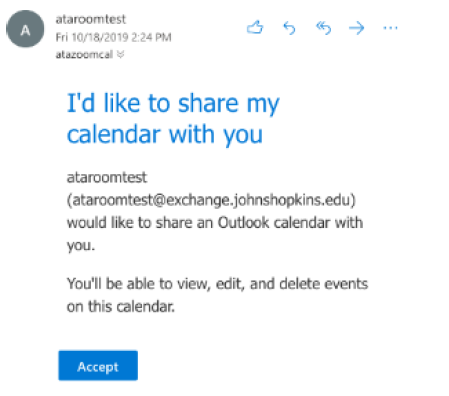
- Sign out of the Zoom Room Calendar’s account and sign in at Outlook Web as the Dedicated User (e.g. [email protected])
- Open the Dedicated User’s mail and accept the invite that was sent by the Zoom Room Calendar
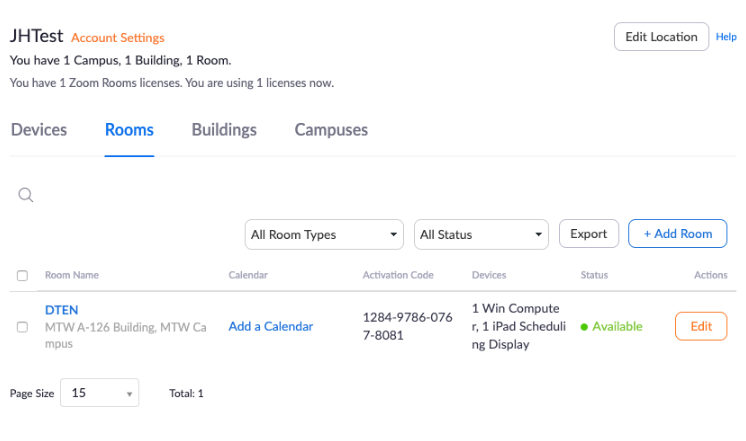
Add the Calendar Resource
As a Zoom Room Admin, once the integration has ben set up, you can add the the calendar resource as follows:
- Go to Zoom Admin > Room Management > Zoom Rooms
- Find your room, e.g., DTEN
- Click on ‘Add a Calendar’
- In the “Add a calendar resource” screen, you should see at least one Calendar integration, e.g., [email protected]
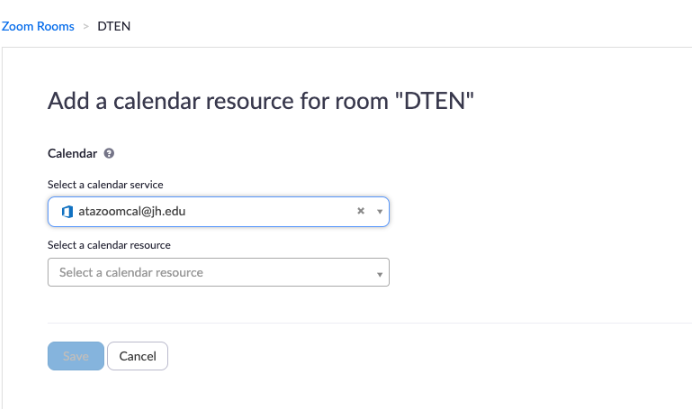
- In “Select a calendar resource”, you should be able to select the ROOM’s calendar, e.g., ataroomtest
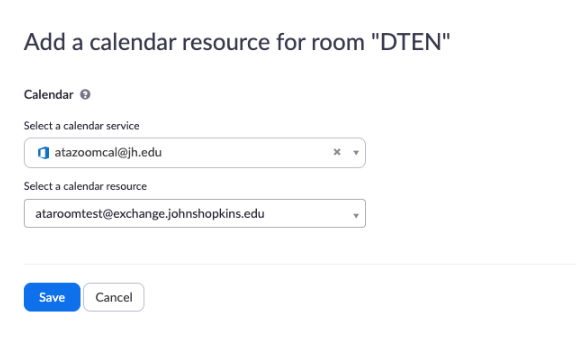
- Click ‘Save’
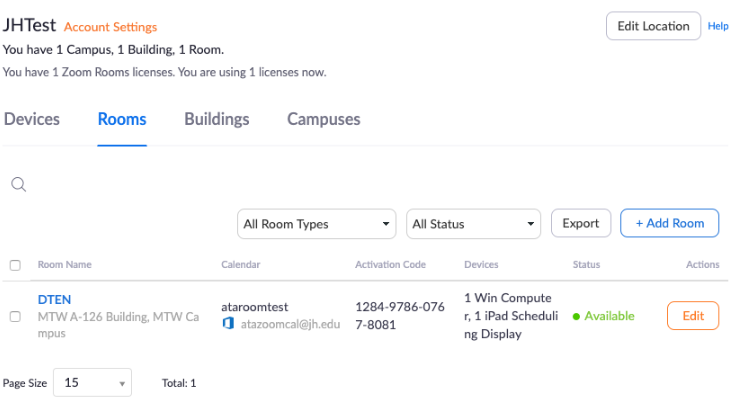
- The Zoom Room listing should now show the calendar associated with the room
Calendar Integration Validation
Outlook
- In Outlook set up a meeting with the Zoom Room (e.g., ataroomtest) and add a Zoom meeting to it.
- Meeting should then appear on the Zoom Room (note: DTEN isn’t as fancy, doesn’t display all upcoming meetings).
iOS Display Scheduler (see Zoom Rooms Scheduling Display)
- If you have an iPad w/ Zoom Room App for iPad installed, you can add is a Display Scheduler for the Zoom Room.
- Use the Display Scheduler to book a meeting with the Zoom Room
Meeting should then appear on the Zoom Room.