- Requesting Access
- Using Cloud Recording
- Accessing the Cloud Recordings
- When Cloud Recording Access Expires
- Uploading Cloud Recordings to Panopto
- FAQ for Students
Requesting Access
Please refer to the table below for the appropriate divisional contact to request Cloud Recording access. If you are a TA, please first contact your instructor. In your request, you should include your name, role within the division, and reason for needing Cloud Recording access. A staff member within the division will then contact you stating that you have been granted or denied access.
| School/Division | Support Contact |
|---|---|
| Advanced Academic Programs (AAP) | [email protected] |
| Carey Business School | [email protected] |
| Center for Talented Youth (CTY) | [email protected] |
| Krieger School of Arts and Sciences (KSAS) | [email protected] |
| Peabody Institute | Peabody Help Desk |
| School of Advanced International Studies (SAIS) | [email protected] |
| School of Education (SOE) | [email protected] |
| School of Medicine (SOM) | Zoom Support – JHU SOM Office of Information Technology |
| School of Nursing (SON) | [email protected] |
| School of Public Health (SPH) |
|
| Whiting School of Engineering (WSE) | [email protected] |
Using Cloud Recording
- If you have been granted access to use Cloud Recording, this setting will automatically be enabled in your Recording settings. To confirm that the feature is available to you, please complete the following:
-
- To ensure that the changes are properly reflected in your account, please first logout of your Zoom account.
- Then, login into your Zoom account at jhubluejays.zoom.us using your JHED credentials.
- Navigate to Settings > Recording > Cloud Recording. You should see that Cloud Recording is toggled on.

– Please Note: If you are supposed to have Cloud Recording access and the feature is not toggled on for your account, please contact [email protected]. -
- To Cloud Record a meeting, complete the following:
-
- Start your meeting (as the host).
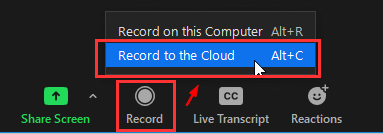
- Click the Record button from your Zoom In-meeting controls and settings. Then select Record to the Cloud.
-
- Click Continue on the Record this meeting to the cloud? pop-up screen.
-
- When Cloud Recording is active, you will see a status icon in the top left corner of your screen.
-
- You can Pause or Stop the recording at anytime using the stop and pause buttons in the meeting controls.
- Cloud Recording will automatically stop if you end the meeting.
-
You can also visit Zoom’s support site for more on how to use Cloud Recording.
Accessing the Cloud Recordings
-
- Login into your Zoom account at jhubluejays.zoom.us using your JHED credentials.
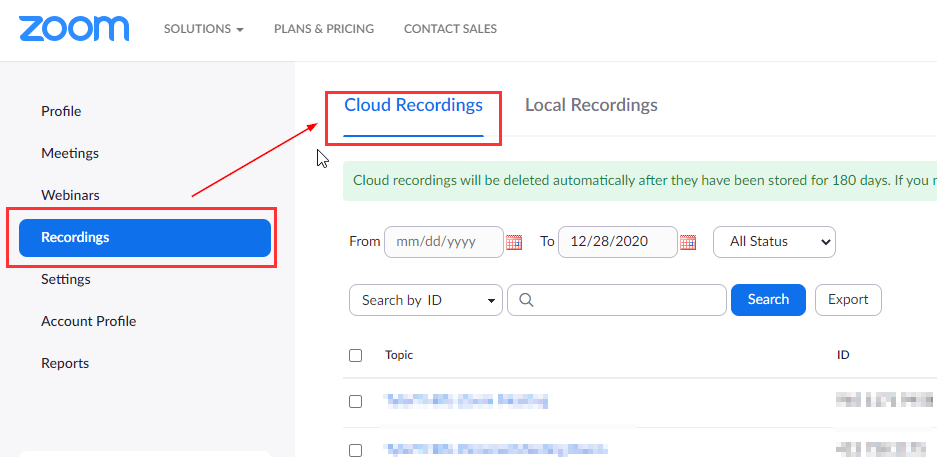
- Navigate to Recordings > Cloud Recordings to see a list of all cloud recordings. Note: Zoom will send you an email once the recording becomes available.
– Please Note: Cloud Recordings are automatically deleted after 180 days. You will need to download them locally before they are automatically deleted if you wish to retain a copy. Zoom will send you a reminder email before the deletion occurs.
When Cloud Recording Access Expires
Cloud Recording access will automatically expire based on the access end date set by your school/division. Before your access ends, you should download all of your recordings locally to your machine. See below for instructions on uploading the recordings to Panopto.
– Please Note: Your cloud recordings will continue to remain in the Blue Jays Student instance once your access has expired. However, if you need to view or download the recordings after access expiration, you will need to re-request access from your school/division.
Uploading Cloud Recordings to Panopto
To upload your cloud recordings to Panopto, follow the CER’s guide, Using Panopto for Zoom Recordings.
For any questions regarding Panopto, contact the CER directly.
FAQ for Students
Please refer to our Cloud Recording FAQs.


