About Webinars
Zoom Video Webinar allows you to broadcast a Zoom meeting to up to 3,000 view-only attendees, depending on the size of your webinar license. Webinar licenses are offered at capacities of 1,000 and 3,000 participants. As the host or a panelist, you can share your screen, video, and audio in a webinar and attendees can use the chat and/or Q&A features to interact with the host and panelists.
For any outlying questions regarding Webinars, please see Zoom’s Webinar Page.
For more on Large Meetings please see our Large Meeting Page.
Requesting a Webinar License
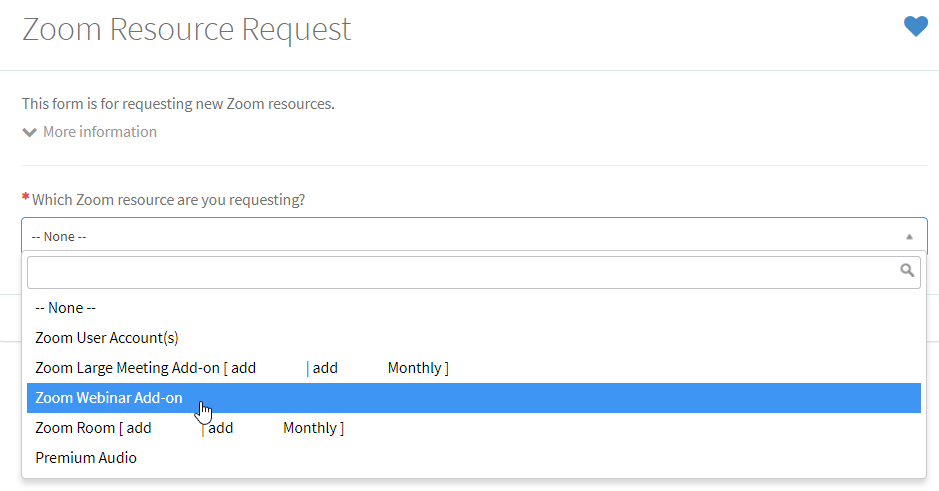
To add a Webinar license to your account, you can request the add-on through the IT Services Catalog.
-
Select Zoom Webinar Add-on from the drop down menu.

-
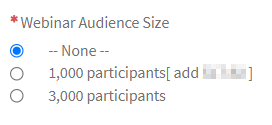
Select the Webinar Audience Size.

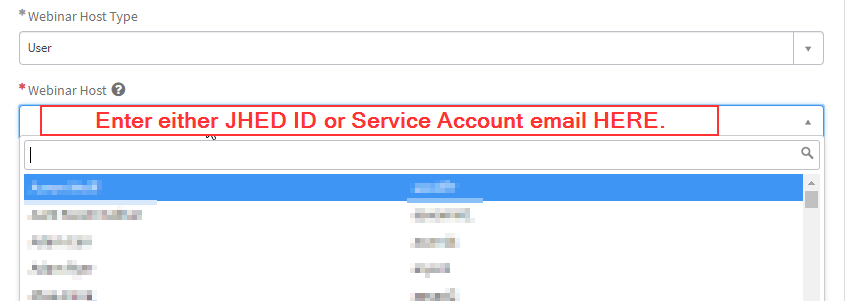
- Select the Webinar Host Type.
-
Enter the JHED ID of the webinar host (for user accounts) or the email address of the service account (for service accounts). Please Note: The user account must be Licensed.

- For the Webinar[1,000] license, please proceed to Step #7.
- For the Webinar[3,000] license, you will need to enter additional information about the event and the duration of time which you will need the license for.
-
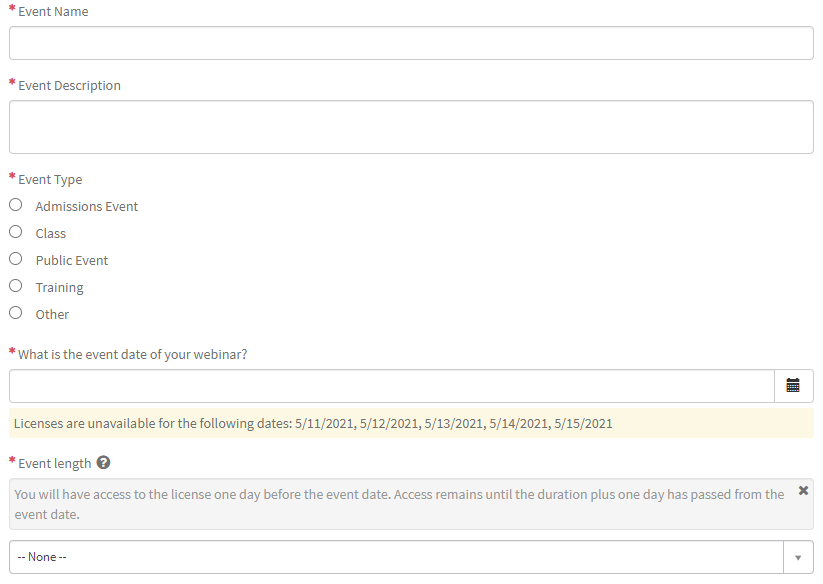
Enter the Event Name, Event Description, Event Type, Event Date, and Event Length. Please Note: You will have access to the license one day before the event date. Access remains until the duration plus one day has passed from the event date.

-
You will also have the option to keep a reduced capacity webinar license, Webinar[1,000], on the account once the event has concluded if you wish to do so. This access is Ongoing.

-
Enter the Event Name, Event Description, Event Type, Event Date, and Event Length. Please Note: You will have access to the license one day before the event date. Access remains until the duration plus one day has passed from the event date.
-
Enter the Cost Center for the license charges. Please Note: If cost center is valid, the Fund Number populates automatically.

- Click Order Now once you are complete.
For Webinar license pricing, please see our product brochure in ServiceNow.
To cancel a webinar add-on or change a cost center, please visit the Zoom Resource Management Portal.
Webinar Features
Host Controls & Participant Management in a Webinar
There are multiple roles available for a webinar: host, co-host, panelist, and attendee. The role that you have in the webinar will be designated by the host.
The host of the webinar is the user who the webinar is scheduled under. They have full permissions to manage the webinar, panelists, and attendees. There can only be one host of a webinar. The host has various in-session controls, such as stopping and starting the webinar, muting panelists, disabling panelists’ video, removing attendees from the webinar, and more.
Co-hosts share many of the controls that hosts have, allowing the co-host to manage the administrative side of the webinar, such as managing attendees or starting/stopping the recording. The host must assign a co-host. Co-hosts cannot start a webinar. If the host needs another Zoom user to start the webinar, they can assign this person as an alternative host.
Panelists are full participants in a webinar. They can view and share video, screen share, annotate, speak to the attendees, and more. You must be assigned panelist permissions by the webinar host. The host can also disable some features for panelists, including starting video, sharing your screen, and recording. Panelists can be invited to participate in the webinar using only their name and an email address, a Zoom account is not required.
Attendees are view-only participants who can be un-muted if the host chooses. Their view of the webinar is controlled by the host. They can interact with the host and the panelists through the Q&A and chat features. Learn about joining a webinar as an attendee by visiting Joining and Participating in a Webinar (attendee).
For more on how to manage attendees and panelists, please see Zoom’s support page on Managing attendees and panelists in a webinar.
Webinar Registration & Scheduling
Webinars can require pre-registration before the event. The host can either automatically approve all registrants or manually approve each one. The host can add custom registration questions and generate reports on these registrations as well.
Scheduling a Webinar with registration requires your registrants to complete a brief form before receiving the link to join your webinar. This allows you to collect the names, email addresses, and other information from the registrants. You can choose to automatically approve anyone who registers or manually approve attendees.
With Webinar registration, registrants can be imported via CSV and automatically approved. Once they have successfully been imported, a confirmation email will be sent to the registrants.
You can customize the registration for webinars, by approving attendees, enabling email notifications for registrations, adding registration questions, and more.
Scheduling a webinar without registration will allow attendees to join without needing to sign up in advance. Attendees will be required to enter their name and email address upon joining.
Similar to a meeting, Zoom allows you to schedule recurring webinars during specific dates and times. You can schedule a webinar to occur daily, weekly, or monthly.
Webinar Branding, Emails, & Streaming
You can customize your webinar registration page with a color scheme, title, banner, logo, and speaker information, including descriptions and profile pictures for up to three speakers. Users can customize these settings when you schedule a webinar that requires registration. Customizable settings for webinars include:
- Title
- Banner
- Logo
- Speaker information
- Theme
- Post attendee URL
- Post webinar survey
- Social media description
With webinar branding, you can customize the emails sent out to the panelists, registrants, attendees, and absentees of the webinar.
If configured, you can live stream a webinar to a custom platform. If you configure this before the webinar, you can begin streaming with one click after your webinar begins.
Q&A vs. Chat
The Question & Answer (Q&A) feature allows attendees to ask questions during the webinar and for the panelists, co-hosts, and host to answer their questions. Answers can be provided by typing in the answers or choosing to “answer live”. With the public Q&A feature enabled, attendees can answer each other’s questions and also up-vote each other’s questions.
The Chat feature allows webinar attendees, the host, co-hosts, and panelists to communicate for the duration of the webinar. Whether attendees can chat with everyone or only the host will depend on the settings that the host has selected.
Webinar Reporting
Webinar Reports allows users to generate different metric and information reports including:
- Registration: Displays a list of registrants and their registration details.
- Attendee: Displays details about each attendee.
- Performance: Displays engagement statistics on registration, attendance, and feedback.
- Q&A: Displays questions and answers from the webinar.
- Polling: Displays each attendee’s poll result.
These reports can be exported in a .CSV format for further analysis.
For step-by-step instructions on how to extract reporting data, please see Zoom’s page on Webinar Reporting.
Webinar Best Practices
See the Webinar Best Practices and Resources for great tips and tricks to set up and run your webinar with ease.
A Webinar Practice Session allows you and your panelists to get set up and acquainted with Zoom webinar controls before starting your webinar. The practice session can only be started by the host or alternative host. Attendees do not partake in the practice session.
Webinar FAQ
Please see our Zoom FAQ page for common questions about Zoom’s Webinar feature.


